Dom
什么是 DOM?
    DOM 是 W3C(万维网联盟)的标准。
    DOM 定义了访问 HTML 和 XML 文档的标准:
    “W3C 文档对象模型 (DOM) 是中立于平台和语言的接口,它允许程序和脚本动态地访问和更新文档的内容、结构和样式。”
    W3C DOM 标准被分为 3 个不同的部分:
    核心 DOM - 针对任何结构化文档的标准模型
    XML DOM - 针对 XML 文档的标准模型
    HTML DOM - 针对 HTML 文档的标准模型
    DOM 是 Document Object Model(文档对象模型)的缩写。
什么是 HTML DOM?
    HTML DOM 是:
    HTML 的标准对象模型
    HTML 的标准编程接口
    W3C 标准
    HTML DOM 定义了所有 HTML 元素的对象和属性,以及访问它们的方法。
Dom
1.帮你找到某个标签
2.进行操作
1、直接查找
|
1
2
3
4
|
document.getElementById 根据ID获取一个标签document.getElementsByName 根据name属性获取标签集合document.getElementsByClassName 根据class属性获取标签集合document.getElementsByTagName 根据标签名获取标签集合 |
2、间接查找
|
1
2
3
4
5
6
7
8
9
10
11
12
13
|
parentNode // 父节点childNodes // 所有子节点firstChild // 第一个子节点lastChild // 最后一个子节点nextSibling // 下一个兄弟节点previousSibling // 上一个兄弟节点parentElement // 父节点标签元素children // 所有子标签firstElementChild // 第一个子标签元素lastElementChild // 最后一个子标签元素nextElementtSibling // 下一个兄弟标签元素previousElementSibling // 上一个兄弟标签元素 |
1、内容
|
1
2
3
4
5
|
innerText 文本outerTextinnerHTML HTML内容innerHTML value 值 |
2、属性
|
1
2
3
4
5
6
7
8
9
|
attributes // 获取所有标签属性setAttribute(key,value) // 设置标签属性getAttribute(key) // 获取指定标签属性/*var atr = document.createAttribute("class");atr.nodeValue="democlass";document.getElementById(‘n1‘).setAttributeNode(atr);*/ |
 Demo
Demo3、class操作
|
1
2
3
|
className // 获取所有类名classList.remove(cls) // 删除指定类classList.add(cls) // 添加类 |
4、标签操作
a.创建标签
|
1
2
3
4
5
6
7
8
|
// 方式一var tag = document.createElement(‘a‘)tag.innerText = "wupeiqi"tag.className = "c1"tag.href = "http://www.cnblogs.com/wupeiqi"// 方式二var tag = "<a class=‘c1‘ href=‘http://www.cnblogs.com/wupeiqi‘>wupeiqi</a>" |
b.操作标签
|
1
2
3
4
5
6
7
8
9
10
11
|
// 方式一var obj = "<input type=‘text‘ />";xxx.insertAdjacentHTML("beforeEnd",obj);xxx.insertAdjacentElement(‘afterBegin‘,document.createElement(‘p‘))//注意:第一个参数只能是‘beforeBegin‘、 ‘afterBegin‘、 ‘beforeEnd‘、 ‘afterEnd‘// 方式二var tag = document.createElement(‘a‘)xxx.appendChild(tag)xxx.insertBefore(tag,xxx[1]) |
5、样式操作
|
1
2
3
4
|
var obj = document.getElementById(‘i1‘)obj.style.fontSize = "32px";obj.style.backgroundColor = "red"; |
Demo6、位置操作
|
1
2
3
4
5
6
7
8
9
10
11
12
13
14
15
16
17
18
19
20
21
22
23
24
25
26
27
28
|
总文档高度document.documentElement.offsetHeight 当前文档占屏幕高度document.documentElement.clientHeight 自身高度tag.offsetHeight 距离上级定位高度tag.offsetTop 父定位标签tag.offsetParent 滚动高度tag.scrollTop/* clientHeight -> 可见区域:height + padding clientTop -> border高度 offsetHeight -> 可见区域:height + padding + border offsetTop -> 上级定位标签的高度 scrollHeight -> 全文高:height + padding scrollTop -> 滚动高度 特别的: document.documentElement代指文档根节点*/ |
test Demo-滚动固定 Demo-滚动菜单 Demo-滚动高度7、提交表单
|
1
|
document.geElementById(‘form‘).submit() |
8、其他操作
|
1
2
3
4
5
6
7
8
9
10
11
12
13
14
|
console.log 输出框alert 弹出框confirm 确认框 // URL和刷新location.href 获取URLlocation.href = "url" 重定向location.reload() 重新加载 // 定时器setInterval 多次定时器clearInterval 清除多次定时器setTimeout 单次定时器clearTimeout 清除单次定时器 |
对于事件需要注意的要点:
this标签当前正在操作的标签,event封装了当前事件的内容
模态对话框
代码:
<!DOCTYPE html>
<html lang="en">
<head>
    <meta charset="UTF-8">
    <title>Title</title>
</head>
<style>
        body{
            margin: 0;
        }
        /*隐藏对话框*/
        .hide{
            display: none !important;
        }

        /*背景铺满*/
        .shade{
            position: fixed;
            top:0;
            bottom: 0;
            left: 0;
            right: 0;
            /**/
            /*opacity: 0.6;*/
            background-color: rgba(0,0,0,.6);
            /*优先级*/
            z-index: 1000;
        }
        /*对话框居中*/
        .modal{
            height: 200px;
            width: 400px;
            background-color: white;
            position: fixed;
            top: 50%;
            left: 50%;
            margin-left: -200px;
            margin-top: -100px;
            z-index: 1001;
        }
</style>

<body>
        <div style="height: 2000px;background-color: #185598">
             <input type="button" value="登陆" onclick="ShowModal();" />
        </div>

        <div id="shade" class="shade hide body"></div>
        <div id="modal" class="modal hide">
            <!--javascript:void(0)相当于python中的pass-->
            <a href="javascript:void(0);" onclick="HideModal();">取消</a>
            <span>用户名:<input type="text" /></span>
        </div>

        <script>
            function ShowModal(){
                var t1 = document.getElementById(‘shade‘);
                var t2 = document.getElementById(‘modal‘);
//                移除标签中的值
                t1.classList.remove(‘hide‘);
                t2.classList.remove(‘hide‘);

            }
            function HideModal(){
                var t1 = document.getElementById(‘shade‘);
                var t2 = document.getElementById(‘modal‘);
                t1.classList.add(‘hide‘);
                t2.classList.add(‘hide‘);

            }


        </script>

</body>
</html>
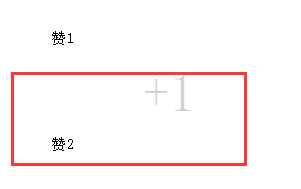
点赞:
代码:
<!DOCTYPE html>
<html lang="en">
<head>
    <meta charset="UTF-8">
    <title>点赞</title>
    <style>
        .item{
            padding: 50px;
            position: relative;
        }
    </style>
</head>
<body>
        <div class="item">
            <a onclick="Favor(this);">赞1</a>
        </div>
        <div class="item">
            <a onclick="Favor(this);">赞2</a>
        </div>
        <div class="item">
            <a onclick="Favor(this);">赞3</a>
        </div>
        <div class="item">
            <a onclick="Favor(this);">赞4</a>
        </div>
        <script>
            function Favor(ths) {
                var top = 49;
                var left = 71;
                var op = 1;
                var fontSize = 18;

                var tag = document.createElement(‘span‘);
                tag.innerText = ‘+1‘;
                tag.style.position = ‘absolute‘;
                tag.style.top = top + ‘px‘;
                tag.style.left = left + ‘px‘;
                tag.style.opacity = op;
                tag.style.fontSize = fontSize + ‘px‘;
                ths.parentElement.appendChild(tag);


                var interval = setInterval(function () {
                    top -= 10;
                    left += 10;
                    fontSize += 5;
                    op -= 0.1;
                    tag.style.top = top + ‘px‘;
                    tag.style.left = left + ‘px‘;
                    tag.style.opacity = op;
                    tag.style.fontSize = fontSize + ‘px‘;
                    if (op <= 0.2) {
                        clearInterval(interval);
                        ths.parentElement.removeChild(tag);
                    }
                }, 50);
            }
        </script>
</body>
</html>
效果图如下:
提交表单
输入不能为空。
代码:
<!DOCTYPE html>
<html lang="en">
<head>
    <meta charset="UTF-8">
    <title>提交form表单!!!!!!</title>
</head>
<body>
    <form action="http://www.baidu.com">
        <input type="text" id="username"/>
        <input type="submit" value="提交" onclick="return SubmitForm();" />
    </form>
    <script>
        function SubmitForm(){
            var user = document.getElementById(‘username‘);
            if(user.value.length > 0 ){
                return true;
            }else{
                alert(‘不能为空‘)
                return false;
            }
        }
    </script>
</body>
</html>
jQuery是一个兼容多浏览器的javascript库,核心理念是write less,do more(写得更少,做得更多),对javascript进行了封装,是的更加便捷的开发,并且在兼容性方面十分优秀。
要想使用jQuery首先得导入代码如下(附加简单应用):
dom也很有用,对于了解jQuery有很大帮助

<!DOCTYPE html>
<html lang="en">
<head>
    <meta charset="UTF-8">
    <title>shuaige</title>
    <style>
        .r {
            background-color:red; /* 给标签设置背景颜色为红色*/
        }
    </style>
</head>
<body>

    <div id="id_1">
        123
    </div>
    <div class="c1">1</div>
    <div class="c1">2</div>
    <div class="c1">3</div>


    <!--导入Jquery文件-->
    <script type="text/javascript" src="jquery-1.8.2.min.js"></script>
    <script>
        $(function () {alert(‘Hello shuaige‘);}); //当页面执行完后加载
        //这里$是什么呢? 他可以理解为jQurey创建的对象,类似于python中的类创建的对象,对象去调用方法一样.!!!仅仅是类似
        $(‘#id_1‘).text(‘456‘);
        //分解  $(‘#id_1‘) 找到id为id_1的标签,并把里面的内容修改为456
        //这里虽然永不倒dom但是,会dom对jQurey有很大的帮助
        $(‘.c1‘).addClass(‘r‘);
        //分解  $(‘.c1‘) 找到class为c1的标签
    </script>
</body>
</html>
就可以这么理解:$(‘这部分是选择‘).操作(function () {} )
实例
菜单栏:
代码:
<!DOCTYPE html>
<html lang="en">
<head>
    <meta charset="UTF-8">
    <title></title>
    <style>
        .hide{
            display: none;
        }
        .menu{
            width: 200px;
            height: 600px;
            border: 1px solid #dddddd;
            overflow: auto;
        }
        .menu .item .title{
            height: 40px;
            line-height: 40px;
            background-color: #2459a2;
            color: white;
        }
    </style>
</head>
<body>

    <div class="menu">
        <div class="item">
            <div class="title" onclick="ShowMenu(this);">菜单一</div>
            <div class="body">
                <p>内容一</p>
                <p>内容一</p>
                <p>内容一</p>
                <p>内容一</p>
                <p>内容一</p>
            </div>

        </div>
        <div class="item">

            <div class="title"  onclick="ShowMenu(this);">菜单二</div>
            <div class="body hide">
                <p>内容二</p>
                <p>内容二</p>
                <p>内容二</p>
                <p>内容二</p>
                <p>内容二</p>
                <p>内容二</p>
            </div>
        </div>
        <div class="item">
            <div class="title"  onclick="ShowMenu(this);">菜单三</div>
            <div class="body hide">
                <p>内容三</p>
                <p>内容三</p>
                <p>内容三</p>
                <p>内容三</p>
                <p>内容三</p>
                <p>内容三</p>
            </div>

        </div>
    </div>
    <script src="jquery-1.12.4.js"></script>
    <script>
        function ShowMenu(ths){
            // console.log(ths); // Dom中的标签对象
            //$(ths)            // Dom标签对象转换成jQuery标签对象(便利)
            //$(ths)[0]          // jQuery标签对象转换成Dom标签对象

            $(ths).next().removeClass(‘hide‘);
            $(ths).parent().siblings().find(‘.body‘).addClass(‘hide‘);
        }
    </script>
</body>
</html>
效果图如下:

JQuery学习网站:http://www.php100.com/manual/jquery/
Dom学习网站:http://www.w3school.com.cn/htmldom/index.asp
原文:http://www.cnblogs.com/Z-style/p/5812087.html