目标:
1、在VirtualBox中安装CentOS
2、配置虚拟机网络,实现:
a.主机联网后,宿机能够通过主机上网
b.不管主机联网与否,主机都能SSH登录宿机,并且主宿机能互相传送文件
安装环境:
1、Win7 64bit 旗舰版
2、VirtualBox 4.3.6
3、CentOS 6.5 x86_64
1、安装VirtualBox虚拟机
安装完成后,在网络连接中多一个"VirtualBox Host-Only
Network"(仅对设置Host_only模式的网络有用)。
打开VirtualBox,管理--全局设定--网络--仅主机(Host-Only)网络:
双击“VirtualBox Host-Only Ethernet Adapter”:
主机虚拟网络界面:
192.168.56.1
255.255.255.0
DHCP 服务器:
192.168.56.100
255.255.255.0
192.168.56.101
192.168.56.254
2、新建并设置CentOS虚拟机
新建虚拟机:
(1)宿机类型:Linux/Red Hat
(2)内存大小:1G
(3)创建磁盘:
大小:20G
选择动态分配始占用空间小,性能稍差;
选择固定大小占用空间较大,性能较好,推荐
(4)存储设置:
CD/DVD控制器中加入准备好的CentOS安装光盘
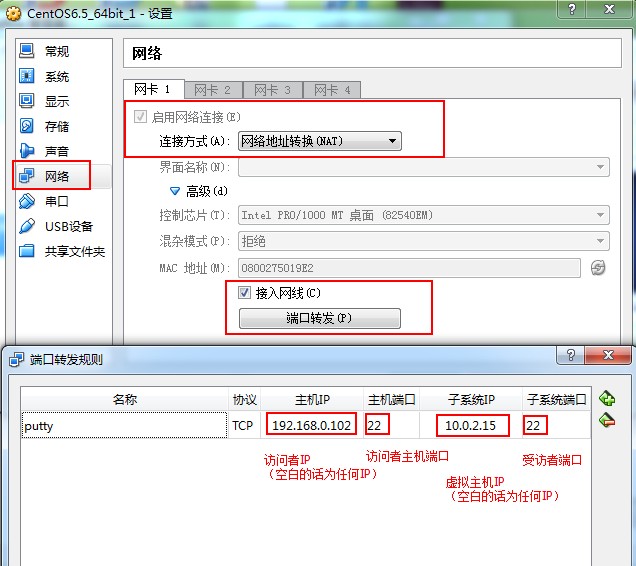
(5)网络设置:
宿机启动第一块网卡
网卡1:NAT
宿机(CemtOS)用这一网卡通过主机(Win7)上网(此时宿机可以访问主机),而主机不能访问宿机。
注意:可以通过网卡1中的“端口转发”设置主机访问宿机中的相应服务,端口转发规则设置具体如下:
3、安装CentOS
简要步骤介绍:
(1)语言:简体中文
(2)安装设备:基本存储设备
(3)主机名:为默认的localhost.localdomain(在没有真正域名前)
(4)网络配置:先忽略
(5)root用户的密码设置
(6)进行哪种类型的安装:使用自定义布局
(7)简单分区方案:/--18G
swap--2G
(8)选择Desktop安装,且现在自定义
(9)将拨号网络、联网工具和Emacs勾选上
(10)开始安装进程直到结束
安装完成之后,只要主机可以上网,宿机的CentOS就可以使用NAT(网卡1)通过主机上网。
网卡1默认分配的IP如下:
eth0:IP:10.0.2.15
4、CentOS安装后网络配置(可选)
若需要配置网络,可参考如下部分(不需要配置的话,直接进入第5部分。为了简单起见,此处我没有作网络配置):
(1)命令配置
(2)文件配置
CentOS中的网络配置文件主要有以下几类:
02 |
/etc/sysconfig/network-scripts/ifcfg-<interface-name> |
04 |
/etc/sysconfig/network |
10 |
/etc/sysconfig/networking/ |
<1>修改IP地址
假设有2块网卡,要修改2块网卡(Host-Only,NAT)的网络设置:
进入/etc/sysconfig/network-scripts目录,修改两块网卡的ifcfg文件如下:
a.
修改ifcfg-eth0文件,配置Host-only网络:
09 |
HWADDR=08:00:27:75:AD:13 |
b. 修改ifcfg-eth1文件,配置NAT网络:
6 |
HWADDR=08:00:27:90:9B:08 |
<2>修改网关
修改对应网卡的网关的配置文件
<3>修改DNS
修改对应网卡的 DNS 的配置文件
3 |
nameserver 202.101.224.68 |
5 |
nameserver 202.101.224.69 |
<4>重新启动网络配置
5、软件源配置
国内速度较快的常用更新源如下:
http://mirrors.163.com/centos/
163-网易
http://mirrors.ta139.com/centos/
中国移动通信(山东移动)
http://centos.ustc.edu.cn/centos/ 中国科学技术大学
http://mirror.neu.edu.cn/centos/ 东北大学
更新yum为网易的源:
更新系统中可以更新的软件:
6、安装VBoxAdditions增强功能
在VirtualBox上安装好CentOS后,再将VBoxAdditions增强功能安装上,主要支持:虚拟机和主机之间共享文件以及无缝窗口和鼠标指针集成等。
(1)更新内核。CentOS
6.3对应的kernel默认为2.6.32-279.el6.i686:
2 |
2.6.32-431.1.2.0.1.el6.x86_64 |
安装增强功能需要kernel-devel包,必须保证kernel-devel和kernel版本的一致。查看软件源中kernel-devel的版本:
02 |
Loaded plugins: fastestmirror, refresh-packagekit, security |
03 |
Repository base is listed more than once in the configuration |
04 |
Repository updates is listed more than once in the configuration |
05 |
Repository extras is listed more than once in the configuration |
06 |
Repository centosplus is listed more than once in the configuration |
07 |
Repository contrib is listed more than once in the configuration |
08 |
Loading mirror speeds from cached hostfile |
13 |
Release : 431.1.2.0.1.el6 |
17 |
Summary : Development package for building kernel modules to match the |
20 |
Description : This package provides kernel headers and makefiles sufficient to |
21 |
: build modules against the kernel package. |
若两者版本不一致,则必须升级kernel:
升级完后必须重启系统,新的kernel才能被使用。
(2)安装kernel-devel和gcc。
(3)安装增强功能。进入增强功能光盘根目录,执行Linux下的安装命令:
03 |
Verifying archive integrity... All good. |
04 |
Uncompressing VirtualBox 4.3.6 Guest Additions for Linux............ |
05 |
VirtualBox Guest Additions installer |
06 |
Removing installed version 4.3.6 of VirtualBox Guest Additions... |
07 |
Copying additional installer modules ... |
08 |
Installing additional modules ... |
09 |
Removing existing VirtualBox non-DKMS kernel modules [确定] |
10 |
Building the VirtualBox Guest Additions kernel modules |
11 |
Building the main Guest Additions module [确定] |
12 |
Building the shared folder support module [确定] |
13 |
Building the OpenGL support module [失败] |
14 |
(Look at /var/log/vboxadd-install.log to find out what went wrong) |
15 |
Doing non-kernel setup of the Guest Additions [确定] |
16 |
Installing the Window System drivers |
17 |
Installing X.Org Server 1.13 modules [确定] |
18 |
Setting up the Window System to use the Guest Additions [确定] |
19 |
You may need to restart the hal service and the Window System (or just restart |
20 |
the guest system) to enable the Guest Additions. |
22 |
Installing graphics libraries and desktop services componen[确定] |
解决Building the OpenGL support module FAILE的问题:
04 |
Verifying archive integrity... All good. |
05 |
Uncompressing VirtualBox 4.3.6 Guest Additions for Linux............ |
06 |
VirtualBox Guest Additions installer |
07 |
Removing installed version 4.3.6 of VirtualBox Guest Additions... |
08 |
Copying additional installer modules ... |
09 |
Installing additional modules ... |
10 |
Removing existing VirtualBox non-DKMS kernel modules [确定] |
11 |
Building the VirtualBox Guest Additions kernel modules |
12 |
Building the main Guest Additions module [确定] |
13 |
Building the shared folder support module [确定] |
14 |
Building the OpenGL support module [确定] |
15 |
Doing non-kernel setup of the Guest Additions [确定] |
16 |
You should restart your guest to make sure the new modules are actually used |
17 |
Installing the Window System drivers |
18 |
Installing X.Org Server 1.13 modules [确定] |
19 |
Setting up the Window System to use the Guest Additions [确定] |
20 |
You may need to restart the hal service and the Window System (or just restart |
21 |
the guest system) to enable the Guest Additions. |
23 |
Installing graphics libraries and desktop services componen[确定] |
至此,增强功能已安装完成,共享文件、无缝窗口和鼠标指针继承等功能已经可以使用啦!
7、宿机重启系统,主机和宿机相互ping下
主机和宿机的网络配置:
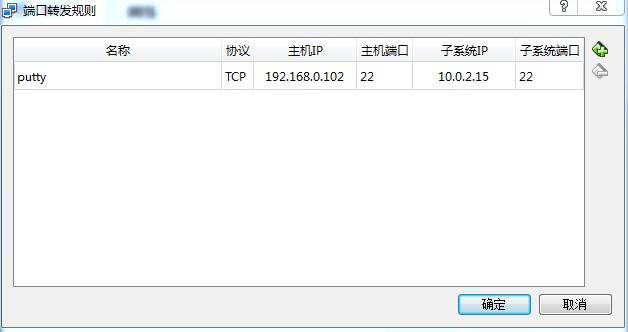
主机(Win7)IP:192.168.0.102;网关:192.168.0.1;DNS:101.226.4.6,114.114.114.114
宿机(CentOS)IP:10.0.2.15
网卡1:NAT
端口转发规则:
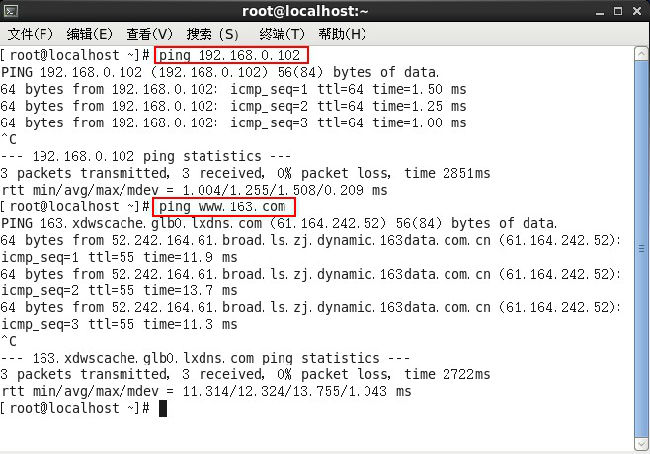
宿机--主机:ping 192.168.0.102 (通过)
宿机--网络:ping www.163.com (通过)
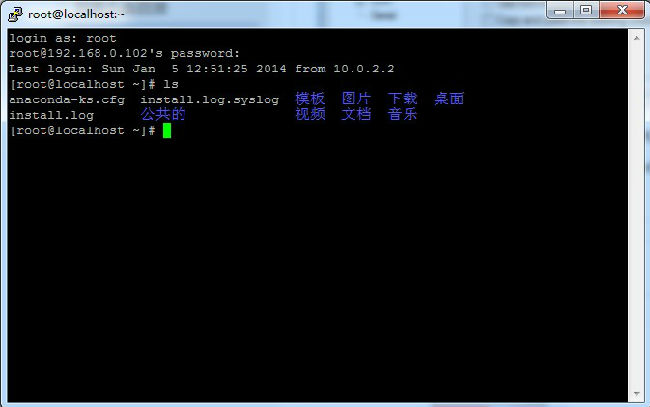
Win7上putty连接CentOS:

这里的Host Name也可填写为:localhost
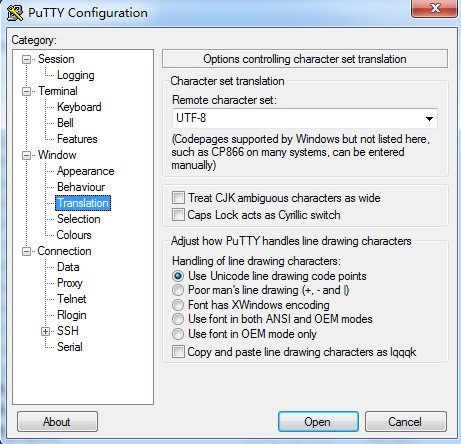
这里设置为UTF-8,是为了避免CentOS中的中文目录为在putty上显示乱码。
点击左侧的Seesion回到最初的界面,单击“Save”将Session保存,然后单击“Open”:
VirtualBox 上安装CentOS 6.5,布布扣,bubuko.com
VirtualBox 上安装CentOS 6.5
原文:http://www.cnblogs.com/dai330713/p/3714006.html