Overview
When writing applications in the Standard Widget Toolkit (SWT), you
may need to use layouts to give your windows a specific look.
A layout controls the position and size of children in
a Composite. Layout classes are subclasses of the abstract
class Layout. SWT provides several standard layout classes,
and you can write custom layout classes.
In SWT, positioning and sizing does not happen automatically. Applications
can decide to size and place a Composite‘s children initially,
or in a resize listener. Another option is to specify a layout class to position
and size the children. If children are not given a size, they will have zero
size and they cannot be seen.
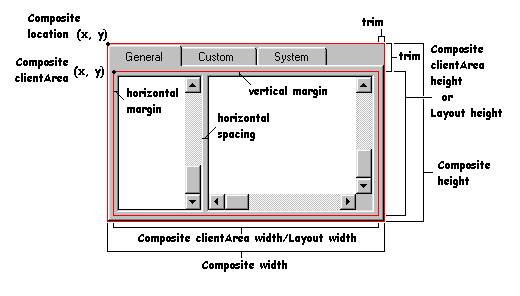
The diagram below illustrates a few general terms that are used when
discussing layouts. The Composite (in this case,
a TabFolder) has
alocation, clientArea and trim. The
size of the Composite is the size of
the clientArea plus the size of the trim.
This Composite has two children that are laid out side by
side. A Layout is managing the size and position of the
children.
This Layout allows spacing between
the children, and a margin between the children and the edges
of the Layout. The size of
the Layout is the same as the size of
theComposite‘s clientArea.
The preferred size of a widget is the minimum size needed
to show its content. In the case of a Composite, the preferred
size is the smallest rectangle that contains all of its children. If children
have been positioned by the application,
the Composite computes its own preferred size based on
the size and position of the children. If a Composite is
using a layout class to position its children, it asks
the Layout to compute the size of
its clientArea, and then it adds in
the trim to determine its preferred size.
Standard Layouts
The standard layout classes in the SWT library are:
FillLayoutlays out equal-sized widgets in a single row or columnRowLayoutlays out widgets in a row or rows, with fill, wrap, and spacing optionsGridLayoutlays out widgets in a gridFormLayoutlays out widgets by creating attachments for each of their sides
To use the standard layouts, you need to import the SWT layout package:
import org.eclipse.swt.layout.*;
Layouts are pluggable. To set a Composite widget‘s
layout, you use the widget‘s setLayout(Layout) method. In
the following code, a Shell(a subclass
of Composite) is told to position its children using
a RowLayout:
Shell shell = new Shell();
shell.setLayout(new RowLayout());
A layout class may have a corresponding layout data class: a subclass
of Object that contains layout data for a specific child.
By convention, layout data classes are identified by substituting "Data" for
"Layout" in the class name. For example, the standard layout
class RowLayout has a layout data class
called RowData, the layout
class GridLayout uses a layout data class
called GridData, and the layout
class FormLayout has a layout data class
called FormData. A widget‘s layout data class is set as
follows:
Button button = new Button(shell, SWT.PUSH);
button.setLayoutData(new RowData(50, 40));
Examples in this Document
Most of the snapshots in this document were taken by running variations on the following example code. We may change the type of layout, the options used, or the type or number of children.
import org.eclipse.swt.SWT;
import org.eclipse.swt.layout.RowLayout;
import org.eclipse.swt.widgets.Button;
import org.eclipse.swt.widgets.Display;
import org.eclipse.swt.widgets.Shell;
public class LayoutExample {
public static void main(String[] args) {
Display display = new Display();
Shell shell = new Shell(display);
// Create the layout.
RowLayout layout = new RowLayout();
// Optionally set layout fields.
layout.wrap = true;
// Set the layout into the composite.
shell.setLayout(layout);
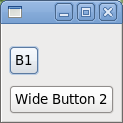
// Create the children of the composite.
new Button(shell, SWT.PUSH).setText("B1");
new Button(shell, SWT.PUSH).setText("Wide Button 2");
new Button(shell, SWT.PUSH).setText("Button 3");
shell.pack();
shell.open();
while (!shell.isDisposed()) {
if (!display.readAndDispatch()) display.sleep();
}
}
}
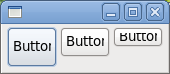
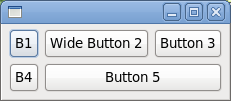
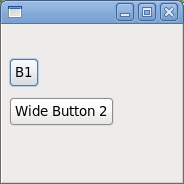
Running the above code results in the following:
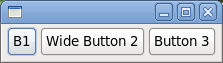
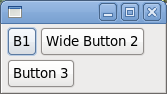
If the user resizes the shell so that there is no longer room for Button 3 on
the right, the RowLayout wraps Button 3 to the next row,
as follows:
Using layouts is closely tied with resize, as we shall see. Consequently,
most of the examples in this document show what would happen if
the Composite becomes smaller or larger, in order to
illustrate how the Layout works.
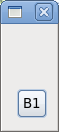
FillLayout
FillLayout is the simplest layout class. It lays out
widgets in a single row or column, forcing them to be the same size. Initially,
the widgets will all be as tall as the tallest widget, and as wide as the
widest. FillLayout does not wrap, and you cannot specify
margins or spacing. You might use it to lay out buttons in a task bar or tool
bar, or to stack checkboxes in
a Group. FillLayout can also be used
when a Composite only has one child. For example, if
a Shell has a
single Group child, FillLayout will
cause the Group to completely fill
the Shell.
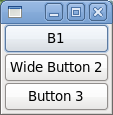
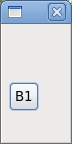
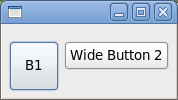
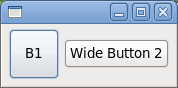
Here is the relevant portion of the example code. First we create
a FillLayout, then (if we want vertical) we set
its type field toSWT.VERTICAL, and set it
into the Composite (a Shell).
The Shell has three push button children, "B1", "Wide
Button 2", and "Button 3". Note that in a FillLayout, children
are always the same size, and they fill all available space.
FillLayout fillLayout = new FillLayout();
fillLayout.type = SWT.VERTICAL;
shell.setLayout(fillLayout);
new Button(shell, SWT.PUSH).setText("B1");
new Button(shell, SWT.PUSH).setText("Wide Button 2");
new Button(shell, SWT.PUSH).setText("Button 3");
The following table shows the differences between a horizontal and
vertical FillLayout, initially and after the parent has
grown.
|
Initial |
After resize | |
fillLayout.type = SWT.HORIZONTAL
(default) |
 |
 |
fillLayout.type = SWT.VERTICAL |
 |
 |
RowLayout
RowLayout is more commonly used
than FillLayout because of its ability to wrap, and
because it provides configurable margins and
spacing. RowLayout has a number of configuration fields.
In addition, the height and width of each widget in
a RowLayout can be specified by setting the
widget‘s RowData object
using setLayoutData.
RowLayoutConfiguration Fields
The type field controls whether
the RowLayout lays out widgets in horizontal rows, or
vertical columns. RowLayouts are horizontal by
default.
The wrap field controls whether or not
the RowLayout will wrap widgets into the next row if
there isn‘t enough space in the current row.RowLayouts wrap by
default.
If the pack field is true, widgets in
a RowLayout will take their natural size ("natural size"
varies by widget; the natural size for a label or push button, for example, is
large enough to display its textual contents), and they will be aligned as far
to the left as possible. If pack is false, widgets will fill the available
space, similar to the widgets in
a FillLayout. RowLayouts pack by
default.
If the justify field is true, widgets in
a RowLayout are spread across the available space from
left to right. If the parent Compositegrows wider, the extra
space is distributed evenly among the widgets. If
both pack and justify are true,
widgets take their natural size, and the extra space is placed between the
widgets in order to keep them fully justified. By
default, RowLayouts do not justify.
The marginLeft, marginTop, marginRight, marginBottom and spacing fields
control the number of pixels between widgets (spacing) and the
number of pixels between a widget and the side of the
parent Composite (margin). By
default, RowLayouts leave 3 pixels for margins and
spacing. The margin and spacing fields are shown in the following
diagram.

RowLayout Examples
The following example code creates a RowLayout, sets all of
its fields to non-default values, and then sets it into
a Shell.
RowLayout rowLayout = new RowLayout();
rowLayout.wrap = false;
rowLayout.pack = false;
rowLayout.justify = true;
rowLayout.type = SWT.VERTICAL;
rowLayout.marginLeft = 5;
rowLayout.marginTop = 5;
rowLayout.marginRight = 5;
rowLayout.marginBottom = 5;
rowLayout.spacing = 0;
shell.setLayout(rowLayout);
If you are using the default field values, you only need one line of code:
shell.setLayout(new RowLayout());
The results of setting specific fields is shown below:
|
Initial |
After resize | |
rowLayout.wrap = true;
rowLayout.pack = true;
rowLayout.justify = false;
rowLayout.type = SWT.HORIZONTAL;
(defaults) |
 |

and  |
wrap = false (clips if not enough space) |
 |
 |
pack = false (all widgets are the same size) |
 |
 |
justify = true (widgets are spread across the available space) |
 |
 |
type = SWT.VERTICAL (widgets are arranged vertically in columns) |
 |
 |
Using RowData Objects with RowLayout
Each widget controlled by a RowLayout can have its
initial width and height specified by setting
its RowData object. The following code
uses RowData objects to change the initial size of
the Buttons in a Shell.
package org.eclipse.articles.layouts.samples;
import org.eclipse.swt.SWT;
import org.eclipse.swt.layout.RowData;
import org.eclipse.swt.layout.RowLayout;
import org.eclipse.swt.widgets.Button;
import org.eclipse.swt.widgets.Display;
import org.eclipse.swt.widgets.Shell;

public class RowDataExample {
	public static void main(String[] args) {
		Display display = new Display();
		Shell shell = new Shell(display);
		shell.setLayout(new RowLayout());
		Button button1 = new Button(shell, SWT.PUSH);
		button1.setText("Button 1");
		button1.setLayoutData(new RowData(50, 40));
		Button button2 = new Button(shell, SWT.PUSH);
		button2.setText("Button 2");
		button2.setLayoutData(new RowData(50, 30));
		Button button3 = new Button(shell, SWT.PUSH);
		button3.setText("Button 3");
		button3.setLayoutData(new RowData(50, 20));
		shell.pack();
		shell.open();
		while (!shell.isDisposed()) {
			if (!display.readAndDispatch())
				display.sleep();
		}
	}
}
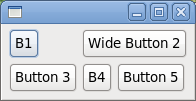
Here is what you see when you run this code.
GridLayout
With a GridLayout, the widget children of
a Composite are laid out in a
grid. GridLayout has a number of configuration fields,
and—likeRowLayout—the widgets it lays out can have an associated
layout data object, called GridData. The power
of GridLayout lies in the ability to
configure GridData for each widget controlled by
the GridLayout.
GridLayout Configuration Fields
The numColumns field is the most important field in
a GridLayout, and it is usually the first field an application
will set. Widgets are laid out in columns from left to right, and a new row is
created when numColumns + 1 widgets are added to
the Composite. The default is to have only 1 column. The
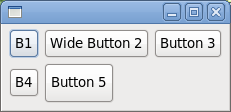
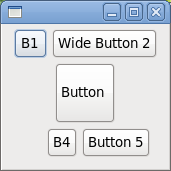
following code creates a Shell with
five Button children of various widths, managed by
a GridLayout. The table below shows the grid
when numColumns is set to one, two, or three.
Display display = new Display();
Shell shell = new Shell(display);
GridLayout gridLayout = new GridLayout();
gridLayout.numColumns = 3;
shell.setLayout(gridLayout);
new Button(shell, SWT.PUSH).setText("B1");
new Button(shell, SWT.PUSH).setText("Wide Button 2");
new Button(shell, SWT.PUSH).setText("Button 3");
new Button(shell, SWT.PUSH).setText("B4");
new Button(shell, SWT.PUSH).setText("Button 5");
shell.pack();
shell.open();

while (!shell.isDisposed()) {
	if (!display.readAndDispatch()) display.sleep();
}
numColumns = 1 |
numColumns = 2 |
numColumns = 3 |
 |
 |
 |
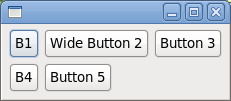
The makeColumnsEqualWidth field forces the columns to
be the same width. The default is false. If we change the
example above to have three columns of equal width, this is what we would get
(note that in the absence of further instruction, widgets are left-justified in
their columns).
The marginWidth, marginHeight, horizontalSpacing,
and verticalSpacing fields in
a GridLayout are similar to those in
a RowLayout. The difference is that the left and right margins
are grouped into marginWidth, and the top and bottom margins
are grouped intomarginHeight. Also, in
a GridLayout you can
specify horizontalSpacing and verticalSpacing independently,
whereas in a RowLayout, spacingapplies to
horizontal or vertical depending on the type of
the RowLayout.
GridData Object Fields
GridData is the layout data object associated
with GridLayout. To set a
widget‘s GridData object, you use
the setLayoutData method. For example, to set
the GridData for a Button, we could do
the following:
Button button1 = new Button(shell, SWT.PUSH);
button1.setText("B1");
button1.setLayoutData(new GridData());
Of course, this code just creates a GridData object
with all of its fields set to their default values, which is the same as not
setting the layout data at all. There are two ways to create
a GridData object with certain fields set. The first is
to set the fields directly:
GridData gridData = new GridData();
gridData.horizontalAlignment = GridData.FILL;
gridData.grabExcessHorizontalSpace = true;
button1.setLayoutData(gridData);

One final note about GridData objects before we get
into their fields: do not reuse GridData objects. Every
widget in a Composite that is managed by
a GridLayout must have a
unique GridData object. If the layout data for a widget
in a GridLayout is null at layout time, a
unique GridData object is created for it.
The horizontalAlignment and verticalAlignment fields
specify where to place a widget horizontally and/or vertically within its grid
cell. Each alignment field can have one of the following values:
BEGINNINGCENTERENDFILL
The default horizontalAlignment is BEGINNING (or left-aligned). The default verticalAlignment is CENTER.
Let‘s go back to our five-button example with three columns, and we will vary
the horizontalAlignment of Button 5.
horizontalAlignment = GridData.BEGINNING (default) |
 |
horizontalAlignment = GridData.CENTER |
 |
horizontalAlignment = GridData.END |
 |
horizontalAlignment = GridData.FILL |
 |
The horizontalIndent field allows you to move a widget
to the right by a specified number of pixels. This field is typically only
useful when
the horizontalAlignment is BEGINNING.
We cannot use a style bit to set the indent, so we will indent "Button 5" in our
example by four pixels as follows:
GridData gridData = new GridData();
gridData.horizontalIndent = 4;
button5.setLayoutData(gridData);
The horizontalSpan and verticalSpan fields
let widgets occupy more than one grid cell. They are often used in conjunction
with FILLalignment. We can make "Button 5" in our example span
the last two cells as follows:
GridData gridData = new GridData();
gridData.horizontalAlignment = GridData.FILL;
gridData.horizontalSpan = 2;
button5.setLayoutData(gridData);
If we decide to make "Wide Button 2" span two cells instead, we would end up with this:
GridData gridData = new GridData();
gridData.horizontalAlignment = GridData.FILL;
gridData.horizontalSpan = 2;
button2.setLayoutData(gridData);
Or we could make "Button 3" span two cells vertically:
GridData gridData = new GridData();
gridData.verticalAlignment = GridData.FILL;
gridData.verticalSpan = 2;
button3.setLayoutData(gridData);
The grabExcessHorizontalSpace and grabExcessVerticalSpace fields
are typically used for larger widgets such
as Text, List or Canvas to
allow them to grow if their containing Composite grows.
If a Text is grabbing excess horizontal space and the
user resizes the Shellwider, then
the Text will get all of the new horizontal space and
other widgets in the same row will stay their original width. Of course, the
widget that is grabbing excess space is also the first one to shrink when
the Shell gets smaller. It is easiest to always think of
the grabExcessSpace fields in the context of
resizing. For a simple example, let‘s reuse the previous example where "Button
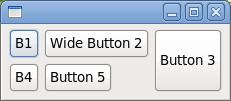
3" spanned two cells vertically. Here it is again:
If we resize this window, the only thing that happens is that the window gets bigger:
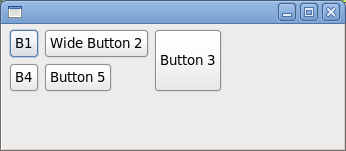
Now we will tell "Button 3" to grab excess horizontal and vertical space, and "B1" and "B4" to fill vertically (without grabbing), and we resize the window again:
Button button1 = new Button(shell, SWT.PUSH);
button1.setText("B1");
GridData gridData = new GridData();
gridData.verticalAlignment = GridData.FILL;
button1.setLayoutData(gridData);

new Button(shell, SWT.PUSH).setText("Wide Button 2");

Button button3 = new Button(shell, SWT.PUSH);
button3.setText("Button 3");
gridData = new GridData();
gridData.verticalAlignment = GridData.FILL;
gridData.verticalSpan = 2;
gridData.grabExcessVerticalSpace = true;
gridData.horizontalAlignment = GridData.FILL;
gridData.grabExcessHorizontalSpace = true;
button3.setLayoutData(gridData);

Button button4 = new Button(shell, SWT.PUSH);
button4.setText("B4");
gridData = new GridData();
gridData.verticalAlignment = GridData.FILL;
button4.setLayoutData(gridData);

new Button(shell, SWT.PUSH).setText("Button 5");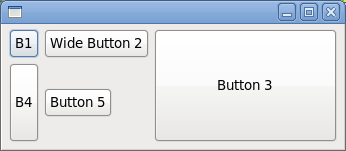
This time, "Button 3" grew in both directions, and "B4" grew vertically. The other buttons stayed their original sizes. Because "Button 3" was grabbing vertically and it spans two rows, the last row that it spans grew taller. Note that "B1" did not grow—although it is filling vertically—because its row did not grow. Since "Button 3" was grabbing horizontally, its column grew wider, and since it was filling horizontally, it grew wider to fill the column.
In a typical application window, you often want to have at least one widget that is grabbing. If more than one widget is trying to grab the same space, then the excess space is shared evenly among the grabbing widgets:
import org.eclipse.swt.SWT;
import org.eclipse.swt.layout.GridData;
import org.eclipse.swt.layout.GridLayout;
import org.eclipse.swt.widgets.Display;
import org.eclipse.swt.widgets.Label;
import org.eclipse.swt.widgets.List;
import org.eclipse.swt.widgets.Shell;
import org.eclipse.swt.widgets.Text;

public class SampleGrabExcess {
	public static void main(String[] args) {
		Display display = new Display();
		Shell shell = new Shell(display);
		shell.setLayout(new GridLayout(2, false));

		Label nameLabel = new Label(shell, SWT.NONE);
		nameLabel.setText("Name:");

		Text nameText = new Text(shell, SWT.BORDER);
		GridData gridData = new GridData();
		gridData.horizontalAlignment = SWT.FILL;
		gridData.grabExcessHorizontalSpace = true;
		nameText.setLayoutData(gridData);
		nameText.setText("Text grows horizontally");

		Label addressLabel = new Label(shell, SWT.NONE);
		addressLabel.setText("Address:");
		gridData = new GridData();
		gridData.verticalAlignment = SWT.TOP;
		addressLabel.setLayoutData(gridData);

		Text addressText = new Text(shell, SWT.BORDER | SWT.WRAP | SWT.MULTI);
		gridData = new GridData();
		gridData.horizontalAlignment = SWT.FILL;
		gridData.grabExcessHorizontalSpace = true;
		gridData.verticalAlignment = SWT.FILL;
		gridData.grabExcessVerticalSpace = true;
		addressText.setLayoutData(gridData);
		addressText.setText("This text field and the List\nbelow share any excess space.");

		Label sportsLabel = new Label(shell, SWT.NONE);
		sportsLabel.setText("Sports played:");
		gridData = new GridData();
		gridData.horizontalSpan = 2;
		sportsLabel.setLayoutData(gridData);

		List sportsList = new List(shell, SWT.BORDER | SWT.MULTI);
		gridData = new GridData();
		gridData.horizontalSpan = 2;
		gridData.horizontalAlignment = SWT.FILL;
		gridData.grabExcessHorizontalSpace = true;
		gridData.verticalAlignment = SWT.FILL;
		gridData.grabExcessVerticalSpace = true;
		sportsList.setLayoutData(gridData);
		sportsList.add("Hockey");
		sportsList.add("Street Hockey");

		shell.pack();
		shell.open();

		while (!shell.isDisposed()) {
			if (!display.readAndDispatch())
				display.sleep();
		}
	}
}

When resized, the single line (top-most) Text grows to
consume all available horizontal space, and the
second Text and the List grow to
consume all remaining space (both vertically and horizontally):

One final point to note about grabbing: if a widget is set to grab excess
horizontal space and its parent Composite grows wider,
then the entire column containing that widget grows wider. If
a widget is grabbing excess vertical space and its
parent Composite grows taller, then the
entire row containing that widget grows taller. The
implication of this is that if any other widget in the affected column or row
has fill alignment, then it will stretch also. Widgets that
have beginning, center, or end alignment will not stretch: they will stay at the
beginning, center or end of the wider column or taller row.
The widthHint and heightHint fields
indicate the number of pixels wide or tall that you would like a widget to be,
assuming that it does not conflict with other requirements in
the GridLayout‘s constraint system. Looking back at the
five-button, three-column example, say we want "Button 5" to be 70 pixels wide
and 40 pixels tall. We code it as follows:
GridData gridData = new GridData();
gridData.widthHint = 70;
gridData.heightHint = 40;
button5.setLayoutData(gridData);
The natural size of "Button 5" is shown in the window on the left, below, and the 70-pixel wide, 40-pixel tall "Button 5" is on the right.
Note, however, that if the horizontalAlignment of
"Button 5" was FILL, then
the GridLayout would not have been able to honor the
request for a width of 70 pixels.
One final comment about using width and height hints: something that looks good on one platform may not look good on another. The variation between font sizes and natural widget sizes across platforms means that hard-coding pixel values is not usually the best way to lay out windows. So, keep the use of size hints to a minimum, if you use them at all.
A Complex GridLayout Example
So far, the GridLayout examples have been fairly
simple, in order to show how each field works. Now, we will put them all
together to create a more complicated example. We start by hand-drawing a rough
sketch of the window we want to create, to determine things like how many
columns the grid should contain, and whether or not any widgets need to
span.
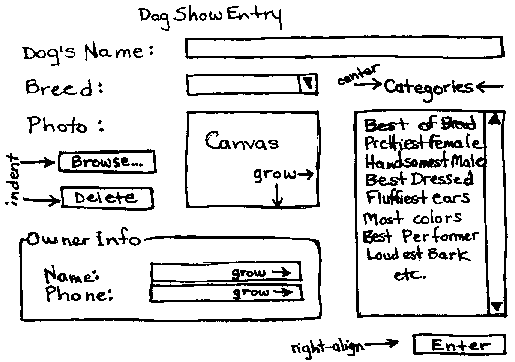
Then we start coding the example from the diagram. The code is below. Note
that we have added a bit of logic to make the code more interesting, for
example, "Browse..." opens a FileDialog to read
an Image file which
the Canvas displays in a paint listener, "Delete" deletes
the Image, and Enter prints the current dog and owner
info.
package org.eclipse.articles.layouts.samples;
import org.eclipse.swt.SWT;
import org.eclipse.swt.events.DisposeEvent;
import org.eclipse.swt.events.DisposeListener;
import org.eclipse.swt.events.PaintEvent;
import org.eclipse.swt.events.PaintListener;
import org.eclipse.swt.events.SelectionAdapter;
import org.eclipse.swt.events.SelectionEvent;
import org.eclipse.swt.graphics.Image;
import org.eclipse.swt.graphics.Rectangle;
import org.eclipse.swt.layout.GridData;
import org.eclipse.swt.layout.GridLayout;
import org.eclipse.swt.widgets.Button;
import org.eclipse.swt.widgets.Canvas;
import org.eclipse.swt.widgets.Combo;
import org.eclipse.swt.widgets.Display;
import org.eclipse.swt.widgets.FileDialog;
import org.eclipse.swt.widgets.Group;
import org.eclipse.swt.widgets.Label;
import org.eclipse.swt.widgets.List;
import org.eclipse.swt.widgets.Shell;
import org.eclipse.swt.widgets.Text;

public class DogShowRegistrationWindow {
	Text dogName;
	Combo dogBreed;
	Canvas dogPhoto;
	Image dogImage;
	List categories;
	Text ownerName;
	Text ownerPhone;

	public static void main(String[] args) {
		Display display = new Display();
		Shell shell = new DogShowRegistrationWindow().createShell(display);
		shell.open();
		while (!shell.isDisposed()) {
			if (!display.readAndDispatch())
				display.sleep();
		}
	}

	public Shell createShell(final Display display) {
		final Shell shell = new Shell(display);
		shell.setText("Dog Show Entry");
		GridLayout gridLayout = new GridLayout();
		gridLayout.numColumns = 3;
		shell.setLayout(gridLayout);

		new Label(shell, SWT.NONE).setText("Dog‘s Name:");

		dogName = new Text(shell, SWT.SINGLE | SWT.BORDER);
		GridData gridData = new GridData(GridData.FILL, GridData.CENTER, true, false);
		gridData.horizontalSpan = 2;
		dogName.setLayoutData(gridData);

		new Label(shell, SWT.NONE).setText("Breed:");

		dogBreed = new Combo(shell, SWT.NONE);
		dogBreed.setItems(new String[] { "Collie", "Pitbull", "Poodle",
				"Scottie", "Black Lab" });
		dogBreed.setLayoutData(new GridData(GridData.FILL, GridData.CENTER, true, false));

		Label label = new Label(shell, SWT.NONE);
		label.setText("Categories");
		label.setLayoutData(new GridData(GridData.CENTER, GridData.CENTER, true, false));

		new Label(shell, SWT.NONE).setText("Photo:");
		dogPhoto = new Canvas(shell, SWT.BORDER);
		gridData = new GridData(GridData.FILL, GridData.FILL, true, true);
		gridData.widthHint = 80;
		gridData.heightHint = 80;
		gridData.verticalSpan = 3;
		dogPhoto.setLayoutData(gridData);
		dogPhoto.addPaintListener(new PaintListener() {
			public void paintControl(final PaintEvent event) {
				if (dogImage != null) {
					event.gc.drawImage(dogImage, 0, 0);
				}
			}
		});

		categories = new List(shell, SWT.MULTI | SWT.BORDER | SWT.V_SCROLL);
		categories.setItems(new String[] { "Best of Breed", "Prettiest Female",
				"Handsomest Male", "Best Dressed", "Fluffiest Ears",
				"Most Colors", "Best Performer", "Loudest Bark",
				"Best Behaved", "Prettiest Eyes", "Most Hair", "Longest Tail",
				"Cutest Trick" });
		gridData = new GridData(GridData.FILL, GridData.FILL, true, true);
		gridData.verticalSpan = 4;
		int listHeight = categories.getItemHeight() * 12;
		Rectangle trim = categories.computeTrim(0, 0, 0, listHeight);
		gridData.heightHint = trim.height;
		categories.setLayoutData(gridData);

		Button browse = new Button(shell, SWT.PUSH);
		browse.setText("Browse...");
		gridData = new GridData(GridData.FILL, GridData.CENTER, true, false);
		gridData.horizontalIndent = 5;
		browse.setLayoutData(gridData);
		browse.addSelectionListener(new SelectionAdapter() {
			public void widgetSelected(SelectionEvent event) {
				String fileName = new FileDialog(shell).open();
				if (fileName != null) {
					dogImage = new Image(display, fileName);
				}
			}
		});

		Button delete = new Button(shell, SWT.PUSH);
		delete.setText("Delete");
		gridData = new GridData(GridData.FILL, GridData.BEGINNING, true, false);
		gridData.horizontalIndent = 5;
		delete.setLayoutData(gridData);
		delete.addSelectionListener(new SelectionAdapter() {
			public void widgetSelected(SelectionEvent event) {
				if (dogImage != null) {
					dogImage.dispose();
					dogImage = null;
					dogPhoto.redraw();
				}
			}
		});

		Group ownerInfo = new Group(shell, SWT.NONE);
		ownerInfo.setText("Owner Info");
		gridLayout = new GridLayout();
		gridLayout.numColumns = 2;
		ownerInfo.setLayout(gridLayout);
		gridData = new GridData(GridData.FILL, GridData.CENTER, true, false);
		gridData.horizontalSpan = 2;
		ownerInfo.setLayoutData(gridData);

		new Label(ownerInfo, SWT.NONE).setText("Name:");
		ownerName = new Text(ownerInfo, SWT.SINGLE | SWT.BORDER);
		ownerName.setLayoutData(new GridData(GridData.FILL, GridData.CENTER, true, false));

		new Label(ownerInfo, SWT.NONE).setText("Phone:");
		ownerPhone = new Text(ownerInfo, SWT.SINGLE | SWT.BORDER);
		ownerPhone.setLayoutData(new GridData(GridData.FILL, GridData.CENTER, true, false));

		Button enter = new Button(shell, SWT.PUSH);
		enter.setText("Enter");
		gridData = new GridData(GridData.END, GridData.CENTER, false, false);
		gridData.horizontalSpan = 3;
		enter.setLayoutData(gridData);
		enter.addSelectionListener(new SelectionAdapter() {
			public void widgetSelected(SelectionEvent event) {
				System.out.println("\nDog Name: " + dogName.getText());
				System.out.println("Dog Breed: " + dogBreed.getText());
				System.out.println("Owner Name: " + ownerName.getText());
				System.out.println("Owner Phone: " + ownerPhone.getText());
				System.out.println("Categories:");
				String cats[] = categories.getSelection();
				for (int i = 0; i > cats.length; i++) {
					System.out.println("\t" + cats[i]);
				}
			}
		});

		shell.addDisposeListener(new DisposeListener() {
			public void widgetDisposed(DisposeEvent arg0) {
				if (dogImage != null) {
					dogImage.dispose();
					dogImage = null;
				}
			}
		});

		shell.pack();

		return shell;
	}
}
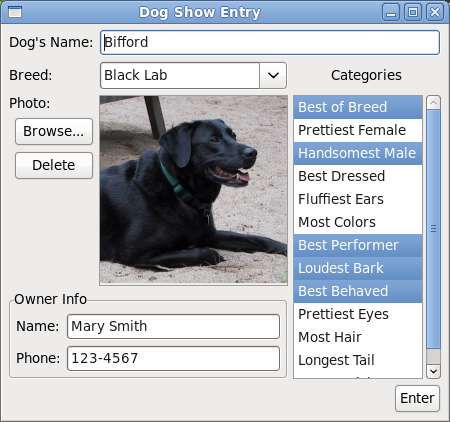
Here is what the window looks like after Mary Smith enters Bifford in the dog show:

If this window is resized larger, the layout adjusts as follows:
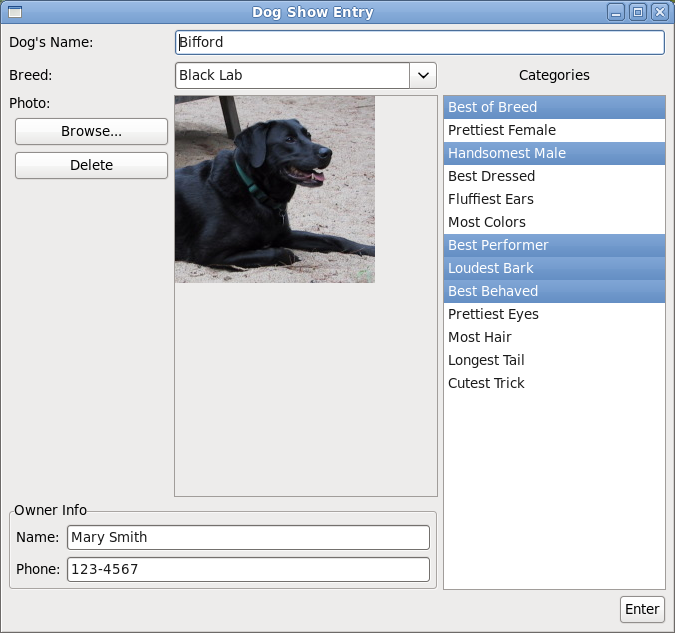
Notice the following:
- There are three columns and seven rows.
- The
dogPhotoCanvasgrew wider and taller because it is filling and grabbing horizontally and vertically (we did not resize theImage, but we could have). - The
dogBreedCombogrew wider because it is filling horizontally, and it is in the same column as theCanvas. - The
dogNameTextgrew wider because it is filling horizontally, and one of the columns it spans is the column containing theCanvas. - The
categoriesListgrew taller because it is filling vertically, and it spans the same rows that theCanvasdoes. - Because the
categoriesListgrew taller, its vertical scrollbar disappeared (it did not grow wider). - The
ownerInfoGroupgrew wider because it is filling horizontally, and one of the columns it spans is the column containing theCanvas. - The
ownerInfoGroup, as a subclass ofComposite, has its ownGridLayoutwith 2 columns and 2 rows. - The
ownerNameandownerPhoneTextsgrew wider because theGroupgrew wider, and they are filling and grabbing horizontally in theGroup‘sGridLayout. - The
browseanddeleteButtonsare indented slightly, and because they both fill horizontally, they are the same width. - The
deleteButtonis vertically aligned at the top of its row. - The "Categories"
Labelis centered over thecategoriesList. - The
enterButtonis horizontally aligned to the right of the 3 columns it spans. - The
dogPhotoCanvaswas created with width and height hints because we want theImageto be 80 pixels x 80 pixels, if possible. - The
categoriesListwas created with a height hint that was based on theList‘s font times 12, because we want try to get theListto show 12 items initially.
FormLayout
FormLayout works by
creating FormAttachments for each side of the widget, and
storing them in the layout data. An attachment ‘attaches‘ a specific side of the
widget either to a position in the parent Composite or to
another widget within the layout. This provides tremendous flexibility when
laying out, as it allows you to specify the placement of individual widgets
within the layout.
FormLayout Configuration Fields
The marginWidth,
and MarginHeight fields
in FormLayout are similar to those
in GridLayout. Left and right margins are defined
bymarginWidth, and top and bottom margins are defined
by marginHeight. Margins can also be defined on a per-widget
basis in the attachments. FormLayout margins are zero by
default.
To set the margins, we create a FormLayout, and set the
margin fields. The following code will set a margin of five pixels around all
four sides of the parent Composite:
Display display = new Display ();
Shell shell = new Shell (display);
FormLayout layout= new FormLayout ();
layout.marginHeight = 5;
layout.marginWidth = 5;
shell.setLayout(layout);
FormData Object Fields
FormData objects specify how each widget in
a FormLayout will be laid out.
Each FormData object defines the attachments for all four
sides of the widget. These attachments tell where to position each side of the
widget. To set a widget‘s FormData object, you use
thesetLayoutData(Object) method, for example:
Button button1 = new Button(shell, SWT.PUSH);
button1.setText("B1");
button1.setLayoutData(new FormData());
This code creates a FormData object with no
attachments. In this case, default attachments are defined, which defeats the
whole purpose and utility of FormLayout. The default
attachments attach the widget to the top and left edges of the
parent Composite. If every widget in
a FormLayout used the default attachments, they would all
be laid out one on top of another in the top left corner of the
parentComposite.
The left, right, top,
and bottom fields
of FormData specify
the FormAttachment objects that are associated with the
left, right, top and bottom sides of the widget, respectively. These fields are
set in the following example:
FormData formData = new FormData();
formData.top = new FormAttachment(0,60);
formData.bottom = new FormAttachment(100,-5);
formData.left = new FormAttachment(20,0);
formData.right = new FormAttachment(100,-3);
button1.setLayoutData(formData);
A FormAttachment object defines the attachment of a
specific side of a widget. There are many ways that a side can be attached: to a
position in the parent Composite, to an edge of
the Composite, to the adjacent side of another widget, to the
opposite side of another widget, or centered on another widget. Attaching to a
position places the side of the widget so that it is always at a percentage of
theComposite. To attach to an edge of
the Composite, the percentage is either 0% or 100%. Attaching
to the adjacent side of another widget ensures that the specified side of the
widget is always next to the closest side of the other widget. Attaching to the
opposite side of another widget ensures that the specific side of the widget is
aligned with the furthest side of the other widget. Finally, attaching to the
center of another widget centers the widget on the other widget. Any of these
ways can be done with or without an offset.
The width and height fields
of FormData specify the requested width and the height of
the widget. If a requested width or height conflicts with constraints set by the
attachments, then that width or height will not be honored. Although setting
attachments can also determine width and height, there are some cases when you
do not want to define attachments for all sides of the widget. In this case, it
may be useful to set the width and height of the widget as follows:
FormData formData = new FormData(20,30);
formData.top = new FormAttachment(0,60);
formData.left = new FormAttachment(20,0);
button1.setLayoutData(formData);
If you wish to set only the width or the height, you can directly set the
width or height field in the FormData object:
FormData formData = new FormData();
formData.width = 30;
formData.top = new FormAttachment(0,60);
formData.bottom = new FormAttachment(100,-5);
formData.left = new FormAttachment(20,0);
button1.setLayoutData(formData);
Note that if a button is attached to the
parent Composite on both sides, when
the Composite is resized, the button will grow or shrink
along with it.
FormAttachment Objects
A FormAttachment is an object that defines the
attachment for a specific side of a widget. It is not always necessary to set an
attachment for all four sides of a widget. Often, specifying one or more sides
of a widget can fully specify its placement in the layout. In order to properly
place your widgets, you should define an attachment for at least one
of left or right in
the FormData, and at least one
of top or bottom. If you only wish to
attach the left side of a widget and not the right, then the widget will be
positioned based on its left side, and the widget will take its natural size (or
its requested size, if one was set for it). If you do not attach the left or the
right, default positioning will attach your widget to the left side of the form.
The same logic applies for the top and bottom sides.
Attaching to a Position
There are many types of attachment. The first is to attach the widget to a
position in the parent Composite. This can be done by defining
a percentage value out of 100, for example:
FormData formData = new FormData();
formData.top = new FormAttachment(50,0);
button1.setLayoutData(formData);

This sets the top of the Button to a position that
represents 50% of the height of the
parent Composite (a Shell), with an
offset of 0. When the shell is resized, the top side of
the Button will still be at 50%, like so:
If we chose to set an offset value, the top side of
the Button would have been set to 50% of
the Composite plus or minus the number of pixels set for
the offset.
We can also define the position of the button using an arbitrary scale, for example:
FormData formData = new FormData();
formData.top = new FormAttachment(30,70,10);
button1.setLayoutData(formData);
If the height of the Composite is defined as being 70
units, this sets the top of the Button to a position
representing 30 units down from the top of the Composite, plus
10 pixels (i.e. 3/7ths of the height of the composite plus 10 pixels).
To attach a side of a widget to an edge of the
parent Composite, set the position to either 0% or 100%. The 0
position is defined as the top of the Composite when
going vertically, and the left when going horizontally. The right and bottom
edges of the Composite are defined as the 100 position.
Therefore, if we want to attach a widget to the right edge of
the Composite, we simply have to create an attachment that
sets the position to 100:
FormData formData = new FormData();
formData.right = new FormAttachment(100,-5);
button1.setLayoutData(formData);

This attaches the right side of the Button to the
right edge of the parent (a Shell), with an offset of five
pixels. Note that the offsets go in one direction only. If you want a widget
offset down or to the right, the offset should be positive. For offsets that
shift the widget up or to the left, the offset should be negative. When
the Shell is resized,
the Button will always be five pixels away from the right
edge:
Attaching to Another Widget
The third type of attachment is to attach the side of the widget to another
control within the parent Composite. The side can be attached
to the adjacent side of the other control (the default), to the opposite side of
the other control, or the widget can be centered on the other control, all with
or without and offset.
The most common way to attach to another control is to attach to its adjacent side. For example, the following code:
FormData formData = new FormData();
formData.top = new FormAttachment(20,0);
button1.setLayoutData(formData);

FormData formData2 = new FormData();
formData2.top = new FormAttachment(button1,10);
button2.setLayoutData(formData2);
This example attaches the top of button2 to the bottom of button1. Note that
when the window is resized, button1 will move so that its top side is always
positioned at 20% of the Shell, and button2 will move so that
its top side is always 10 pixels below the adjacent (bottom) side of
button1.
While the default is to attach the side of a widget to the adjacent side of a
control, FormAttachments can also be created to attach to the
opposite side of a control. This is useful when lining up widgets. In this case,
you create the attachment to the other control
using TOP, BOTTOM, LEFT or RIGHT alignment,
for example:
formData2.top = new FormAttachment(button1,0,SWT.TOP);
In the following example, the top side of button1 is
positioned at 20% of the Shell. button2‘s
top side is aligned with button1‘s top side,
using TOP alignment. This means that the top side
of button2 is also positioned at 20% of
the Shell. Note that when specifying the top attachment, only
the vertical placement of the widget is being defined. It is still necessary to
set the left attachment for button2so that
the Buttons are not stacked on top of each other.
FormData formData = new FormData(50,50);
formData.top = new FormAttachment(20,0);
button1.setLayoutData(formData);

FormData formData2 = new FormData();
formData2.left = new FormAttachment(button1,5);
formData2.top = new FormAttachment(button1,0,SWT.TOP);
button2.setLayoutData(formData2);
The final way to attach a widget to another control is to center it on the
other control. This is useful when the widgets are different sizes. In this
case, you create the attachment to the other control
with CENTER alignment, for example:
formData.top = new FormAttachment(button1,0,SWT.CENTER);
This will place the top of the widget in a position that will allow the widget to be centered on the other control, with an offset of 0. Setting only the top, or the bottom, or both as a center attachment will produce the same result. The top side of the widget is not centered, but the entire widget is centered, so this only needs to be specified once. Here is an example:
FormData formData1 = new FormData (50,50);
button1.setLayoutData(formData1);

FormData formData2 = new FormData ();
formData2.left = new FormAttachment (button1,5);
formData2.top = new FormAttachment (button1,0,SWT.CENTER);
button2.setLayoutData(formData2);
Using the different types of FormAttachment allows
layouts to be defined in many different
ways. FormLayout covers certain cases that cannot be
solved
using FillLayout, RowLayout or GridLayout,
making it a very useful class for defining layouts.
Important: Do not define circular attachments. For example, do not attach the right edge of button1 to the left edge of button2 and then attach the left edge button2 to the right edge of button1. This will over-constrain the layout, causing undefined behavior. The algorithm will terminate, but the results are undefined. Therefore, make sure that you do not over-constrain your widgets. Only provide the attachments necessary to properly lay out the widgets.
A FormLayout Example
So far, all the examples using FormLayout have
involved one or two Buttons, to show
how FormAttachments work. Next, we will do a simple example
using more Buttons to show how a layout can be arranged using
the attachments. We‘ll start by drawing a basic diagram outlining the
attachments that we wish to create.

FormData data1 = new FormData();
data1.left = new FormAttachment(0,5);
data1.right = new FormAttachment(25,0);
button1.setLayoutData(data1);

FormData data2 = new FormData();
data2.left = new FormAttachment(button1,5);
data2.right = new FormAttachment(100,-5);
button2.setLayoutData(data2);

FormData data3 = new FormData(60,60);
data3.top = new FormAttachment(button1,5);
data3.left = new FormAttachment(50,-30);
data3.right = new FormAttachment(50,30);
button3.setLayoutData(data3);

FormData data4 = new FormData();
data4.top = new FormAttachment(button3,5);
data4.bottom = new FormAttachment(100,-5);
data4.left = new FormAttachment(25,0);
button4.setLayoutData(data4);

FormData data5 = new FormData();
data5.bottom = new FormAttachment(100,-5);
data5.left = new FormAttachment(button4,5);
button5.setLayoutData(data5);
In this case, since no top attachment was defined
for button1 or button2, they are
attached to the top of the layout. button3 is centred in
the layout using percentages and offsets on the left and right
sides. button4 and button5 are
attached to the bottom of the layout with a five pixel offset.
When we resize, the attachments become more
visible. button1 is attached on the left and the right
side, so when the window is resized, it grows. Note that the right side will
always be at 25% of the window. The same resize results apply
for button2, as both sides are attached. The left side is
attached to button1, so it will always be at 25% plus five
pixels. button3 stays in the center of the window,
horizontally. button4 is attached at the top and the
bottom, so it grows vertically when the window is resized, but it is only
attached on the left and not the right, so it does not grow
horizontally. button5 will not grow or shrink, but it
will always stay five pixels away from button4 on the
left, and five pixels away from the bottom of the window.

A Complex FormLayout Example
To illustrate how FormLayout can be used for more
complicated arrangements, the Dog Show Entry example done previously
for GridLayout is redone
using FormLayout. This code produces an identical layout, but
uses different concepts to achieve it.
import org.eclipse.swt.SWT;
import org.eclipse.swt.events.PaintEvent;
import org.eclipse.swt.events.PaintListener;
import org.eclipse.swt.events.SelectionAdapter;
import org.eclipse.swt.events.SelectionEvent;
import org.eclipse.swt.graphics.Image;
import org.eclipse.swt.layout.FormAttachment;
import org.eclipse.swt.layout.FormData;
import org.eclipse.swt.layout.FormLayout;
import org.eclipse.swt.widgets.Button;
import org.eclipse.swt.widgets.Canvas;
import org.eclipse.swt.widgets.Combo;
import org.eclipse.swt.widgets.Display;
import org.eclipse.swt.widgets.FileDialog;
import org.eclipse.swt.widgets.Group;
import org.eclipse.swt.widgets.Label;
import org.eclipse.swt.widgets.List;
import org.eclipse.swt.widgets.Shell;
import org.eclipse.swt.widgets.Text;

public class DogShowRegistrationWindowWithFormLayout {
	Image dogImage;
	Text dogNameText;
	Combo dogBreedCombo;
	Canvas dogPhoto;
	List categories;
	Text nameText;
	Text phoneText;

	public static void main(String[] args) {
		Display display = new Display();
		Shell shell = new DogShowRegistrationWindow().createShell(display);
		shell.open();
		while (!shell.isDisposed()) {
			if (!display.readAndDispatch())
				display.sleep();
		}
	}

	public Shell createShell(final Display display) {
		final Shell shell = new Shell(display);
		FormLayout layout = new FormLayout();
		layout.marginWidth = 5;
		layout.marginHeight = 5;
		shell.setLayout(layout);
		shell.setText("Dog Show Entry");

		Group ownerInfo = new Group(shell, SWT.NONE);
		ownerInfo.setText("Owner Info");
		FormLayout ownerLayout = new FormLayout();
		ownerLayout.marginWidth = 5;
		ownerLayout.marginHeight = 5;
		ownerInfo.setLayout(ownerLayout);

		Label dogName = new Label(shell, SWT.NONE);
		dogName.setText("Dog‘s Name:");
		dogNameText = new Text(shell, SWT.SINGLE | SWT.BORDER);

		Label dogBreed = new Label(shell, SWT.NONE);
		dogBreed.setText("Breed:");

		dogBreedCombo = new Combo(shell, SWT.NONE);
		dogBreedCombo.setItems(new String[] { "Collie", "Pitbull", "Poodle",
				"Scottie", "Black Lab" });

		Label photo = new Label(shell, SWT.NONE);
		photo.setText("Photo:");
		dogPhoto = new Canvas(shell, SWT.BORDER);

		Button browse = new Button(shell, SWT.PUSH);
		browse.setText("Browse...");

		Button delete = new Button(shell, SWT.PUSH);
		delete.setText("Delete");

		Label cats = new Label(shell, SWT.NONE);
		cats.setText("Categories");
		categories = new List(shell, SWT.MULTI | SWT.BORDER | SWT.V_SCROLL
				| SWT.H_SCROLL);
		categories.setItems(new String[] { "Best of Breed", "Prettiest Female",
				"Handsomest Male", "Best Dressed", "Fluffiest Ears",
				"Most Colors", "Best Performer", "Loudest Bark",
				"Best Behaved", "Prettiest Eyes", "Most Hair", "Longest Tail",
				"Cutest Trick" });

		Button enter = new Button(shell, SWT.PUSH);
		enter.setText("Enter");
		FormData data = new FormData();
		data.top = new FormAttachment(dogNameText, 0, SWT.CENTER);
		dogName.setLayoutData(data);
		data = new FormData();
		data.left = new FormAttachment(dogName, 5);
		data.right = new FormAttachment(100, 0);
		dogNameText.setLayoutData(data);

		data = new FormData();
		data.top = new FormAttachment(dogBreedCombo, 0, SWT.CENTER);
		dogBreed.setLayoutData(data);
		data = new FormData();
		data.top = new FormAttachment(dogNameText, 5);
		data.left = new FormAttachment(dogNameText, 0, SWT.LEFT);
		data.right = new FormAttachment(categories, -5);
		dogBreedCombo.setLayoutData(data);

		data = new FormData(80, 80);
		data.top = new FormAttachment(dogBreedCombo, 5);
		data.left = new FormAttachment(dogNameText, 0, SWT.LEFT);
		data.right = new FormAttachment(categories, -5);
		data.bottom = new FormAttachment(ownerInfo, -5);
		dogPhoto.setLayoutData(data);
		dogPhoto.addPaintListener(new PaintListener() {
			public void paintControl(final PaintEvent event) {
				if (dogImage != null) {
					event.gc.drawImage(dogImage, 0, 0);
				}
			}
		});
		data = new FormData();
		data.top = new FormAttachment(dogPhoto, 0, SWT.TOP);
		photo.setLayoutData(data);
		data = new FormData();
		data.top = new FormAttachment(photo, 5);
		data.right = new FormAttachment(dogPhoto, -5);
		browse.setLayoutData(data);
		browse.addSelectionListener(new SelectionAdapter() {
			public void widgetSelected(SelectionEvent event) {
				String fileName = new FileDialog(shell).open();
				if (fileName != null) {
					dogImage = new Image(display, fileName);
				}
			}
		});

		data = new FormData();
		data.left = new FormAttachment(browse, 0, SWT.LEFT);
		data.top = new FormAttachment(browse, 5);
		data.right = new FormAttachment(dogPhoto, -5);
		delete.setLayoutData(data);
		delete.addSelectionListener(new SelectionAdapter() {
			public void widgetSelected(SelectionEvent event) {
				if (dogImage != null) {
					dogImage.dispose();
					dogImage = null;
					dogPhoto.redraw();
				}
			}
		});

		data = new FormData(90, 140);
		data.top = new FormAttachment(dogPhoto, 0, SWT.TOP);
		data.right = new FormAttachment(100, 0);
		data.bottom = new FormAttachment(enter, -5);
		categories.setLayoutData(data);

		data = new FormData();
		data.bottom = new FormAttachment(categories, -5);
		data.left = new FormAttachment(categories, 0, SWT.CENTER);
		cats.setLayoutData(data);

		data = new FormData();
		data.right = new FormAttachment(100, 0);
		data.bottom = new FormAttachment(100, 0);
		enter.setLayoutData(data);
		enter.addSelectionListener(new SelectionAdapter() {
			public void widgetSelected(SelectionEvent event) {
				System.out.println("\nDog Name: " + dogNameText.getText());
				System.out.println("Dog Breed: " + dogBreedCombo.getText());
				System.out.println("Owner Name: " + nameText.getText());
				System.out.println("Owner Phone: " + phoneText.getText());
				System.out.println("Categories:");
				String cats[] = categories.getSelection();
				for (int i = 0; i < cats.length; i++) {
					System.out.println("\t" + cats[i]);
				}
			}
		});

		data = new FormData();
		data.bottom = new FormAttachment(enter, -5);
		data.left = new FormAttachment(0, 0);
		data.right = new FormAttachment(categories, -5);
		ownerInfo.setLayoutData(data);

		Label name = new Label(ownerInfo, SWT.NULL);
		name.setText("Name:");

		Label phone = new Label(ownerInfo, SWT.PUSH);
		phone.setText("Phone:");

		nameText = new Text(ownerInfo, SWT.SINGLE | SWT.BORDER);
		phoneText = new Text(ownerInfo, SWT.SINGLE | SWT.BORDER);

		data = new FormData();
		data.top = new FormAttachment(nameText, 0, SWT.CENTER);
		name.setLayoutData(data);

		data = new FormData();
		data.top = new FormAttachment(phoneText, 0, SWT.CENTER);
		phone.setLayoutData(data);

		data = new FormData();
		data.left = new FormAttachment(phone, 5);
		data.right = new FormAttachment(100, 0);
		nameText.setLayoutData(data);

		data = new FormData();
		data.left = new FormAttachment(nameText, 0, SWT.LEFT);
		data.right = new FormAttachment(100, 0);
		data.top = new FormAttachment(55, 0);
		phoneText.setLayoutData(data);

		shell.pack();

		return shell;
	}
}
This is what the layout looks like after Mary Smith enters Bifford in the dog show:
When the window is resized, the same controls are resized as in
the GridLayout example.

Writing Your Own Layout Class
Occasionally, you may want to write your
own Layout class. Perhaps your layout needs are very
complex. Maybe you have the same look in many places, and you want to take
advantage of code reuse. Or you want to leverage domain knowledge to create a
very efficient layout class. Whatever the reason, there are things to consider
before writing a new class:
- Can the layout be done using
a
GridLayoutorFormLayout, with maybe a few nested layouts? - Can the desired effect be more easily achieved with a resize listener?
- Are you defining a general layout algorithm or just positioning widgets?
Unless you are writing a very generic Layout type that
will be used by several Composite widgets, it is often
better and easier to simply calculate sizes and position children in a resize
listener. Many of the SWT custom widgets were written this way. Although a new
widget can be implemented as
a Composite/Layout pair, implementing it as
a Composite that does its layout in a resize listener and
computes its preferred size in computeSize is clearer,
and does not involve writing an extra class.
First, we will look at how layouts work, and then we will create a
new Layout class. Another example of writing your
own Layout can be found in the Compound Widget
Example section of Creating
Your Own Widgets Using SWT, which shows how to achieve the same look using
either a resize listener or a new Layout class.
How Layouts Work
Layout is the abstract superclass of all layouts. It only
has two
methods: computeSize and layout. The
class is defined as follows:
public abstract class Layout {
    protected abstract Point computeSize(Composite composite, int widthHint, int heightHint, boolean flushCache);
    protected abstract void layout(Composite composite, boolean flushCache);
}
The computeSize method calculates the width and height
of a rectangle that encloses all of the Composite‘s children
once they have been sized and placed according to the layout algorithm encoded
in the Layout class. The hint parameters allow the width
and/or height to be constrained. For example, a layout may choose to grow in one
dimension if constrained in another. A hint of SWT.DEFAULT means to use the
preferred size.
The layout method positions and sizes
the Composite‘s children. A Layout can
choose to cache layout-related information, such as the preferred extent of each
of the children. The flushCache parameter tells
the Layout to flush cached data.
Since a Layout controls the size and placement of
widgets in a Composite, there are several methods
in Composite that are used withLayouts.
The first two methods allow setting and getting
a Layout object in a Composite.
public void setLayout(Layout layout);
public Layout getLayout();
An application can force a Layout to recalculate the
sizes of and reposition children by sending layout() to
the parent Composite.
public void layout(boolean changed);
public void layout();
    // calls layout(true);
You would do this after changing anything about the children that might
affect their size or position, such as changing the font of a child, changing
the text or image of a child, adding a new child, or adding children to a child
(If the child can accommodate the change, then layout may not be necessary; for
example, changing the font or text of a scrollable
multi-line Text). Since these changes are done
programmatically, they do not cause events to happen. Consequently, the parent
doesn‘t know about the changes, and has to be told through
the layout method. This strategy reduces flash because
the application can make several changes and then tell the parent to layout, and
the children are only redrawn once instead of once per change.
If layout() is not called and changes are made after the
shell is opened, then the children may not be correctly laid out until the shell
is somehow resized. Note that shell.open() causes a
layout to occur.
The computeSize methods of
a Composite calculate the Composite‘s preferred size,
which is the size of its client area as determined by
the Layout, plus its trim.
public Point computeSize(int widthHint, int heightHint, boolean changed);
public Point computeSize(int widthHint, int heightHint);
    // calls computeSize(widthHint, heightHint, true);
The clientArea of
a Composite is the rectangle that will contain all of the
children. A Layout positions the children inside the
client area.
public Rectangle getClientArea ();
The trim of a Composite is
the area outside the client area. For some composites, the size of the trim is
zero. The trim can be computed by passing the dimensions of the client area into
the method computeTrim.
public Rectangle computeTrim (int x, int y, int width, int height);
Sending pack to
a Composite resizes it to its preferred size.
public void pack(boolean changed);
    // calls setSize(computeSize(SWT.DEFAULT, SWT.DEFAULT, changed));
public void pack();
    // calls pack(true);
The boolean parameter to
the layout, computeSize,
and pack methods is
the changed flag. If true, it indicates
that the Composite‘s contents have changed in some way that
affects its preferred size, therefore any caches that
the Layout may have been keeping need to be flushed. When
a Composite is resized, it asks
its Layout to lay out its children by calling
layout(false); therefore widget content caches
are not flushed. This lets
the Layout perform any expensive calculations only when
necessary.
Caching can increase performance, but it can also be tricky. You can choose not to cache at all: in fact, it is best not to try caching until your code is stable. When considering what to cache, be certain not to store any widget state, such as the text of a label, or the number of items in a list.
Custom Layout Example
If you have several vertically
oriented Composite widgets in your application, you might
choose to write ColumnLayout. We will show a simple version of
a Layout class that lays
out Composite children into a single column. The class
has fixed margins and spacing. Children are given the same width, but they take
their natural height. (Note that RowLayout will
have ColumnLayout behaviour if its type is set
to SWT.VERTICAL. This example is, therefore, just an example.
In practice, if you need to lay widgets out in a column, you would
use RowLayout.)
The code for the ColumnLayout class is below. Note
that we cache the width of the widest child, and the sum of the child heights
(plus spacing), and these values are used to compute the size and lie out the
children. They are recalculated
if flushCache is true.
import org.eclipse.swt.*;
import org.eclipse.swt.graphics.*;
import org.eclipse.swt.widgets.*;
import org.eclipse.swt.layout.*;

public class ColumnLayout extends Layout {
    // fixed margin and spacing
    public static final int MARGIN = 4;
    public static final int SPACING = 2;
    // cache
    Point[] sizes;
    int maxWidth, totalHeight;

    protected Point computeSize(Composite composite, int wHint, int hHint,
            boolean flushCache) {
        Control children[] = composite.getChildren();
        if (flushCache || sizes == null || sizes.length != children.length) {
            initialize(children);
        }
        int width = wHint, height = hHint;
        if (wHint == SWT.DEFAULT)
            width = maxWidth;
        if (hHint == SWT.DEFAULT)
            height = totalHeight;
        return new Point(width + 2 * MARGIN, height + 2 * MARGIN);
    }

    protected void layout(Composite composite, boolean flushCache) {
        Control children[] = composite.getChildren();
        if (flushCache || sizes == null || sizes.length != children.length) {
            initialize(children);
        }
        Rectangle rect = composite.getClientArea();
        int x = MARGIN, y = MARGIN;
        int width = Math.max(rect.width - 2 * MARGIN, maxWidth);
        for (int i = 0; i < children.length; i++) {
            int height = sizes[i].y;
            children[i].setBounds(x, y, width, height);
            y += height + SPACING;
        }
    }

    void initialize(Control children[]) {
        maxWidth = 0;
        totalHeight = 0;
        sizes = new Point[children.length];
        for (int i = 0; i < children.length; i++) {
            sizes[i] = children[i].computeSize(SWT.DEFAULT, SWT.DEFAULT, true);
            maxWidth = Math.max(maxWidth, sizes[i].x);
            totalHeight += sizes[i].y;
        }
        totalHeight += (children.length - 1) * SPACING;
    }
}
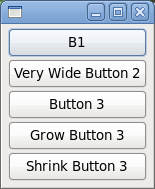
Here is some simple test code to test the ColumnLayout.
The grow and shrink Buttons show
a call to the Shell‘s layout() method
to force a re-layout after changing the width of one of the children.
Calling layout() is the same as
calling layout(true) which tells
theColumnLayout to flush its caches before setting the bounds
of the children. The Shell is also told
to pack() after laying out the children. This forces
the Shell to take the new size.
import org.eclipse.swt.*;
import org.eclipse.swt.widgets.*;
import org.eclipse.swt.layout.*;
import org.eclipse.swt.events.*;

public class ColumnLayoutTest {
    static Shell shell;
    static Button button3;

    public static void main(String[] args) {
        Display display = new Display();
        shell = new Shell(display);
        shell.setLayout(new ColumnLayout());
        new Button(shell, SWT.PUSH).setText("B1");
        new Button(shell, SWT.PUSH).setText("Very Wide Button 2");
        (button3 = new Button(shell, SWT.PUSH)).setText("Button 3");
        Button grow = new Button(shell, SWT.PUSH);
        grow.setText("Grow Button 3");
        grow.addSelectionListener(new SelectionAdapter() {
            public void widgetSelected(SelectionEvent e) {
                button3.setText("Extreemely Wide Button 3");
                shell.layout();
                shell.pack();
            }
        });
        Button shrink = new Button(shell, SWT.PUSH);
        shrink.setText("Shrink Button 3");
        shrink.addSelectionListener(new SelectionAdapter() {
            public void widgetSelected(SelectionEvent e) {
                button3.setText("Button 3");
                shell.layout();
                shell.pack();
            }
        });
        shell.pack();
        shell.open();
        while (!shell.isDisposed()) {
            if (!display.readAndDispatch())
                display.sleep();
        }
    }
}
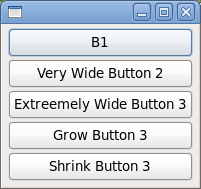
If we run the test code, the window on the left appears. Pressing the Grow Button 3 button results in the window on the right. Resizing the window with the mouse will also make the buttons wider (or narrower) but they do not grow taller.
Overriding Composite
If you are writing your own widget, as outlined in Creating Your Own Widgets Using SWT, and you subclass Composite, then here are a few points to consider for your implementation:
- If you are providing trimmings in your new
Composite, make sure to override bothcomputeTrim()andgetClientArea(). - Never override
layout(), but you may overridelayout(boolean).
Sometimes you want your new Composite to have a
specific look, and you don‘t want the application to be able to specify a
layout. Your new Composite would either do its layout in
a resize handler or using a private custom layout. In either case, you will
probably want to do the following:
- Override
setLayout()to do nothing. - Override
layout(boolean)to call your layout code. - Override
computeSize()to correctly compute the size of yourComposite.
Summary
SWT provides several different ways to lay out widgets. The simplest method,
and the one you will typically use, is to use one of the
standard Layout classes: FillLayout, RowLayout, GridLayout or FormLayout.
In certain cases you may want to write your
own Layout class to provide a very specific look or to
reuse very similar layout code, but often a resize listener on the parent widget
will suffice.
For further assistance in understanding the standard
SWT Layout classes, see the SWT
Snippets.