本文介绍系统缓存组件,采用NOSQL之Redis作为系统缓存层。
一、背景
系统考虑到高并发的使用场景。对于并发提交场景,通过上一章节介绍的RabbitMQ组件解决。对于系统高并发查询,为了提供性能减少数据库压力,我们加入缓存机制,可以不同层次加入缓存支持,本文主要介绍应用服务层和数据层之间加入缓存机制提升性能。业界缓存组件有Redis、Memcached、MemoryCache。本系统采用Redis缓存组件,有些系统将Redis当作MQ使用,此场景本系统用RabbitMQ,Redis主要用于系统缓存应用。
二、Redis简介
Redis是一个开源的Key-Value数据库,使用C语言编写、支持网络、可基于内存亦可持久化的NOSQL数据库,并提供多种语言的API,例如:Java,C/C++,C#,PHP,JavaScript,Perl,Object-C,Python,Ruby等语言驱动。自Redis3.0开始支持集群方案。
相关Redis Cluster 原理在此不多介绍,网络上有很多资料。
三、Redis集群应用
(一)环境介绍
本系统基于Linux之CentOS搭建Redis3.0集群。将三个Instance部署于一台虚拟机,应用部署于windows平台。
| 序号 | 服务IP | 说明 |
| 1 | 192.168.1.110 |
Redis节点A端口:7000(M),7003(S) Redis节点B端口:7001(M),7004(S) Redis节点C端口:7002(M),7005(S) |
(二)安装Redis
1、安装相关依赖工具
|
1
|
[root@andoncentos 桌面]# yum -y install gcc openssl-devel libyaml-devel libffi-devel readline-devel zlib-devel gdbm-devel ncurses-devel gcc-c++ automake autoconf |
2、安装Redis 3.0.6
|
1
|
[root@andoncentos 桌面]# cd /usr/loacal |
|
1
|
[root@andoncentos loacal]# wget http://download.redis.io/releases/redis-3.0.6.tar.gz |
|
1
|
[root@andoncentos 桌面]#<span class="line"> tar xvf redis-3.0.6.tar.gz<br></span> |
|
1
|
[root@andoncentos 桌面]# <span class="line">cd redis-3.0.6/</span> |
|
1
|
[root@andoncentos 桌面]# <span class="line">make MALLOC=libc</span> |
|
1
|
<span class="line">[root@andoncentos redis-3.0.6]# make install</span> |
3、由于我们使用不同端口号区分,在两个服务各自建立以端口命名的文件夹。配置7000节点服务,将redis-server和redis.conf复制到/etc/redis/7000
|
1
|
[root@andoncentos 桌面]# mkdir /etc/redis/7000 |
|
1
|
[root@andoncentos 桌面]# mkdir /etc/redis/7001 |
|
1
|
[root@andoncentos 桌面]# mkdir /etc/redis/7002 |
|
1
|
[root@andoncentos 桌面]# mkdir /etc/redis/7003 |
|
1
|
[root@andoncentos 桌面]# mkdir /etc/redis/7004 |
|
1
|
[root@andoncentos 桌面]# mkdir /etc/redis/7005 |
|
1
|
[root@andoncentos redis-3.0.6]# cp /usr/local/redis-3.0.6/src/redis-server /usr/local/redis-3.0.6/redis.conf /etc/redis/7000 |
|
1
|
[root@andoncentos redis-3.0.6]# vim /etc/redis/7000/redis.conf |
port 7000
daemonize yes
pidfile /var/run/redis_7000.pid
cluster-enabled yes
cluster-config-file nodes.conf
logfile "/var/log/redisd7000.log"
dir /etc/redis/7000/
cluster-node-timeout 5000
appendonly yes
4、修改redis服务的启动脚本,修改内容,并复制相关其他的节点配置
|
1
2
|
[root@andoncentos redis-3.0.6]# cp /usr/local/redis-3.0.6/utils/redis_init_script /etc/init.d/redis7000[root@andoncentos redis-3.0.6]# vim /etc/init.d/redis7000 |
#!/bin/sh
# chkconfig 2345 90 10
# description:Redis is a persistent key-value database
# Simple Redis init.d script conceived to work on Linux systems
# as it does use of the /proc filesystem.
REDISPORT=7000
# EXEC=/usr/local/bin/redis-server
EXEC=/etc/redis/${REDISPORT}/redis-server
CLIEXEC=/usr/local/bin/redis-cli
PIDFILE=/var/run/redis_${REDISPORT}.pid
CONF="/etc/redis/${REDISPORT}/redis.conf"
|
1
2
3
|
[root@andoncentos redis-3.0.6]# cp /etc/init.d/redis7000 /etc/init.d/redis7001[root@andoncentos redis-3.0.6]# cp /etc/init.d/redis7000 /etc/init.d/redis7003[root@andoncentos redis-3.0.6]# cp /etc/init.d/redis7000 /etc/init.d/redis7004 |
5、设置为开机自启动服务器
|
1
2
3
4
|
[root@andoncentos redis-3.0.6]# chkconfig redis7000 on[root@andoncentos redis-3.0.6]# chkconfig redis7001 on[root@andoncentos redis-3.0.6]# chkconfig redis7003 on[root@andoncentos redis-3.0.6]# chkconfig redis7004 on |
6、重启系统,并检查redis7000,redis7001,redis7003,redis7004服务情况
|
1
|
[root@andoncentos redis-3.0.6]# reboot<br>[root@andoncentos 桌面]# systemctl status redis7004.service |
(三)配置Redis集群
1、按照 ruby tree 工具,因为redis集群需要ruby
|
1
|
[root@andoncentos redis-3.0.6]# yum -y install tcl ruby tree<br>[root@andoncentos 桌面]# gem install redis --version 3.0.6 |
Fetching: redis-3.0.6.gem (100%)
Successfully installed redis-3.0.6
Parsing documentation for redis-3.0.6
Installing ri documentation for redis-3.0.6
1 gem installed
2、redis-trib.rb 配置集群
|
1
2
3
4
5
6
7
8
9
10
11
12
13
14
15
16
17
18
19
20
21
22
23
24
25
26
27
28
29
30
31
32
33
34
35
36
37
38
39
40
41
42
43
44
45
46
47
|
[root@andoncentos 桌面]# /usr/local/redis-3.0.6/src/redis-trib.rb create --replicas 1 192.168.1.110:7000 192.168.1.110:7001 192.168.1.110:7002 192.168.1.110:7003 192.168.1.110:7004 192.168.1.110:7005>>> Creating cluster>>> Performing hash slots allocation on 6 nodes...Using 3 masters:192.168.1.110:7000192.168.1.110:7001192.168.1.110:7002Adding replica 192.168.1.110:7003 to 192.168.1.110:7000Adding replica 192.168.1.110:7004 to 192.168.1.110:7001Adding replica 192.168.1.110:7005 to 192.168.1.110:7002M: b164701893bfbdc078e2f7e3b16f1216c1bf65ff 192.168.1.110:7000 slots:0-5460 (5461 slots) masterM: 4c2d36c55cff692a7bbeccb663197b555747d15d 192.168.1.110:7001 slots:5461-10922 (5462 slots) masterM: b147e4dfcd63c5ce059540db55a9d7cb9fa093eb 192.168.1.110:7002 slots:10923-16383 (5461 slots) masterS: 757381aa5cc5c8ba70f3798f6de6cb7b2e97f924 192.168.1.110:7003 replicates b164701893bfbdc078e2f7e3b16f1216c1bf65ffS: fecc8edf32fc72cd4a5d8ae5306fe4083abfe8e9 192.168.1.110:7004 replicates 4c2d36c55cff692a7bbeccb663197b555747d15dS: 98bd8e1aff631a3bee7f92a39764decea16ee955 192.168.1.110:7005 replicates b147e4dfcd63c5ce059540db55a9d7cb9fa093ebCan I set the above configuration? (type ‘yes‘ to accept): <strong>yes</strong> >>> Nodes configuration updated>>> Assign a different config epoch to each node>>> Sending CLUSTER MEET messages to join the clusterWaiting for the cluster to join....>>> Performing Cluster Check (using node 192.168.1.110:7000)M: b164701893bfbdc078e2f7e3b16f1216c1bf65ff 192.168.1.110:7000 slots:0-5460 (5461 slots) masterM: 4c2d36c55cff692a7bbeccb663197b555747d15d 192.168.1.110:7001 slots:5461-10922 (5462 slots) masterM: b147e4dfcd63c5ce059540db55a9d7cb9fa093eb 192.168.1.110:7002 slots:10923-16383 (5461 slots) masterM: 757381aa5cc5c8ba70f3798f6de6cb7b2e97f924 192.168.1.110:7003 slots: (0 slots) master replicates b164701893bfbdc078e2f7e3b16f1216c1bf65ffM: fecc8edf32fc72cd4a5d8ae5306fe4083abfe8e9 192.168.1.110:7004 slots: (0 slots) master replicates 4c2d36c55cff692a7bbeccb663197b555747d15dM: 98bd8e1aff631a3bee7f92a39764decea16ee955 192.168.1.110:7005 slots: (0 slots) master replicates b147e4dfcd63c5ce059540db55a9d7cb9fa093eb[OK] All nodes agree about slots configuration.>>> Check for open slots...>>> Check slots coverage...[OK] All 16384 slots covered. |
3、检查集群状态
|
1
|
[root@andoncentos 桌面]# /usr/local/redis-3.0.6/src/redis-trib.rb check 192.168.1.110:7000 |
4、若出错的话,通过如下命令行修复
|
1
|
[root@andoncentos 桌面]# /usr/local/redis-3.0.6/src/redis-trib.rb fix 192.168.1.110:7000 |
5、防火墙开放端口,并重启防火墙
|
1
2
3
4
|
[root@andoncentos 桌面]# firewall-cmd --zone=public --add-port=7000-7005/tcp --permanentsuccess[root@andoncentos 桌面]# firewall-cmd --reloadsuccess |
6、检查集群情况
|
1
2
3
4
5
6
7
8
9
10
11
12
13
|
[root@andoncentos 桌面]# redis-cli -c -p 7000127.0.0.1:7000> cluster infocluster_state:okcluster_slots_assigned:16384cluster_slots_ok:16384cluster_slots_pfail:0cluster_slots_fail:0cluster_known_nodes:6cluster_size:3cluster_current_epoch:6cluster_my_epoch:1cluster_stats_messages_sent:2492cluster_stats_messages_received:2492 |
四、使用说明
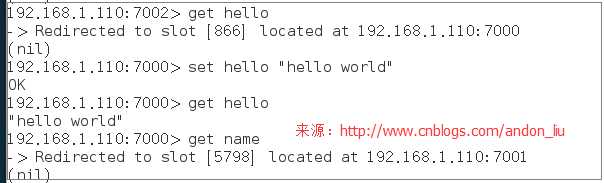
(一)使用命令行测试缓存
(二)通过C#代码测试缓存
1、通过使用stackexchang.redis组件,将数据缓存到集群redis服务。
|
1
2
3
4
5
6
7
|
var cfg = RedisCachingSectionHandler.GetConfig();var serializer = new NewtonsoftSerializer();var redis = new StackExchangeRedisCacheClient(serializer, cfg);var cls = new Cls(){ ID = 1, Name = txt };string key = "tkey" + new Random().Next(1000, 9999).ToString();redis.Add<Cls>(key, cls); |
2、通过key获取数据
|
1
2
3
4
5
|
var cfg = RedisCachingSectionHandler.GetConfig();var serializer = new NewtonsoftSerializer();var redis = new StackExchangeRedisCacheClient(serializer, cfg);var entity = redis.Get<Cls>(key); ViewBag.KV = entity != null ? entity.Name : ""; |
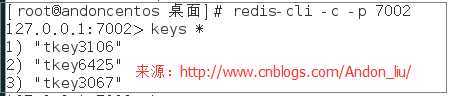
3、redis缓存情况
五、总结
redis cluster 默认支持HA,但是对于单个Instance故障,使用者需要自行判断处理的机制,后续有待于研究,但是redis codis 这方面提供了方便的支持。
原文:http://www.cnblogs.com/Leo_wl/p/5463779.html