本篇我们来介绍Windows Phone 8.1 新特性中的列表选择控件。
在Windows Phone 8 时代,大家都会使用 LongListSelector 来实现列表选择控件,对数据进行分组显示。比如通讯录中,按照名字首字母进行分组,点击分组标题后跳转到该标题对应的分组。
而Windows Phone 8.1 中会利用 ListView 和 SemanticZoom 来实现,下面我们来看看实现过程。
首先我们来认识一下ListView 和 SemanticZoom:
ListView 从字面上并不难理解,一个列表视图控件,而它实际的作用也和字面表现的差不多,它是一个在一个列表中滚动显示项目的集合控件。
SemanticZoom 可能看起来有些陌生,语义缩放。它是允许用户在集合项目的两个视图之间缩放的一个容器控件。简单来说,当我们对一个联系人集合进行了按首字母分组后,我们可以通过语义缩放控件完成联系人列表和字母列表两种视图的缩放,通过选择字母来导航到该字母分组。
下面我们来看看代码实现,首先是XAML:

<SemanticZoom x:Name="semanticZoom" IsZoomOutButtonEnabled="True" CanChangeViews="True">
    <SemanticZoom.ZoomedInView>
        <ListView x:Name="listViewDetail" IsSwipeEnabled="True" IsTapEnabled="True" IsItemClickEnabled="True" IsZoomedInView="True">
            <ListView.ItemTemplate>
                <DataTemplate>
                    <Grid Height="40">
                        <Grid.ColumnDefinitions>
                            <ColumnDefinition Width="50"/>
                            <ColumnDefinition Width="*"/>
                        </Grid.ColumnDefinitions>
                        <Border Background="AliceBlue" Grid.Column="0"/>
                        <TextBlock Grid.Column="1" Text="{Binding ContactName}" FontSize="30"/>
                    </Grid>
                </DataTemplate>
            </ListView.ItemTemplate>
            <ListView.GroupStyle>
                <GroupStyle>
                    <GroupStyle.HeaderTemplate>
                        <DataTemplate>
                            <Border Background="Blue" Height="50" Width="50" HorizontalAlignment="Left" Margin="0,20,0,20" Tapped="Border_Tapped">
                                <TextBlock Text="{Binding Title}" FontSize="30"/>
                            </Border>
                        </DataTemplate>
                    </GroupStyle.HeaderTemplate>
                    <GroupStyle.Panel>
                        <ItemsPanelTemplate>
                            <VariableSizedWrapGrid Orientation="Vertical" Margin="0 0 0 20" ItemHeight="75"/>
                        </ItemsPanelTemplate>
                    </GroupStyle.Panel>
                </GroupStyle>
            </ListView.GroupStyle>
            <ListView.ItemsPanel>
                <ItemsPanelTemplate>
                    <StackPanel Orientation="Vertical" />
                </ItemsPanelTemplate>
            </ListView.ItemsPanel>
        </ListView>
    </SemanticZoom.ZoomedInView>
    <SemanticZoom.ZoomedOutView>
        <ListView x:Name="listViewSummary" Background="Black" IsZoomedInView="False">
            <ListView.ItemTemplate>
                <DataTemplate>
                    <Border Height="70" Width="400" Background="Blue" Margin="10,10,10,10">
                        <TextBlock Text="{Binding Group.Title}" FontSize="30"/>
                    </Border>
                </DataTemplate>
            </ListView.ItemTemplate>
            <ListView.ItemsPanel>
                <ItemsPanelTemplate>
                    <StackPanel Orientation="Vertical"/>
                </ItemsPanelTemplate>
            </ListView.ItemsPanel>
        </ListView>
    </SemanticZoom.ZoomedOutView>
</SemanticZoom>
代码中我们为SemanticZoom 定义了两种视图,ZoomedInView 和 ZoomedOutView,分别代表元素列表视图和概要(分组名)视图。为这两种视图分别定义了内容,即 ListView。ZoomedInView 中我们定义了一个联系人列表,每个元素包括了一个Border 和一个代表人名的文本控件,这些元素按照首字母分组,点击首字母时进入ZoomedOutView。ZoomedOutView 是一个字母列表,选择某个字母后,列表回到ZoomedInView,且导航到该字母的分组。
下面我们看看数据的绑定过程:
protected override void OnNavigatedTo(NavigationEventArgs e)
{
    CollectionViewSource listViewSource = new CollectionViewSource();
    listViewSource.IsSourceGrouped = true;
    listViewSource.Source = GetContactGroups();
    listViewSource.ItemsPath = new PropertyPath("Contacts");
    listViewDetail.ItemsSource = listViewSource.View;
    listViewSummary.ItemsSource = listViewSource.View.CollectionGroups;
}

private List<ContactGroup> GetContactGroups()
{
    List<ContactGroup> groups = new List<ContactGroup>();
    ContactGroup groupA = new ContactGroup() { Title = "A", Contacts = new List<Contact>() { new Contact("Alan"), new Contact("Allen"), new Contact("Azar") } };
    ContactGroup groupB = new ContactGroup() { Title = "B", Contacts = new List<Contact>() { new Contact("Ben"), new Contact("Benzema") } };
    ContactGroup groupC = new ContactGroup() { Title = "C", Contacts = new List<Contact>() { new Contact("Cat"), new Contact("Canby"), new Contact("Candy") } };
    ContactGroup groupJ = new ContactGroup() { Title = "J", Contacts = new List<Contact>() { new Contact("James"), new Contact("Jim"), new Contact("Jimmy") } };
    ContactGroup groupK = new ContactGroup() { Title = "K", Contacts = new List<Contact>() { new Contact("Kevin"), new Contact("King") } };
    ContactGroup groupO = new ContactGroup() { Title = "O", Contacts = new List<Contact>() { new Contact("Oscar"), new Contact("Owen") } };
    ContactGroup groupP = new ContactGroup() { Title = "P", Contacts = new List<Contact>() { new Contact("Pendy") } };
    ContactGroup groupY = new ContactGroup() { Title = "Y", Contacts = new List<Contact>() { new Contact("Yark"), new Contact("York")} };
    ContactGroup groupZ = new ContactGroup() { Title = "Z", Contacts = new List<Contact>() { new Contact("Zend"), new Contact("Zin")} };
    groups.Add(groupA);
    groups.Add(groupB);
    groups.Add(groupC);
    groups.Add(groupJ);
    groups.Add(groupK);
    groups.Add(groupO);
    groups.Add(groupP);
    groups.Add(groupY);
    groups.Add(groupZ);
    return groups;
}

private void Border_Tapped(object sender, TappedRoutedEventArgs e)
{
    semanticZoom.IsZoomedInViewActive = false;
}
public class Contact
{
    public string ContactName { get; set; }

    public Contact(string name)
    {
        ContactName = name;
    }
}

public class ContactGroup
{
    public string Title { get; set; }
    public List<Contact> Contacts { get; set; }
}
这里我们演示了数据结构的定义,示例数据的生成和绑定。我们重点来看一下数据绑定的过程,这个过程在 OnNavigatedTo 方法中。
我们定义了一个 CollectionViewSource 类型的实例,它可以向集合类添加分组支持的数据源。把它的Source设置为我们定义的数据分组集合。
ItemsPath 代表在组内查找组的属性路径。然后把listViewDetail 和 listViewSummary 的数据源分别设置为 CollectionViewSource 的视图对象和视图的集合组。
这样我们的示例就完成了,来看一下运行效果:
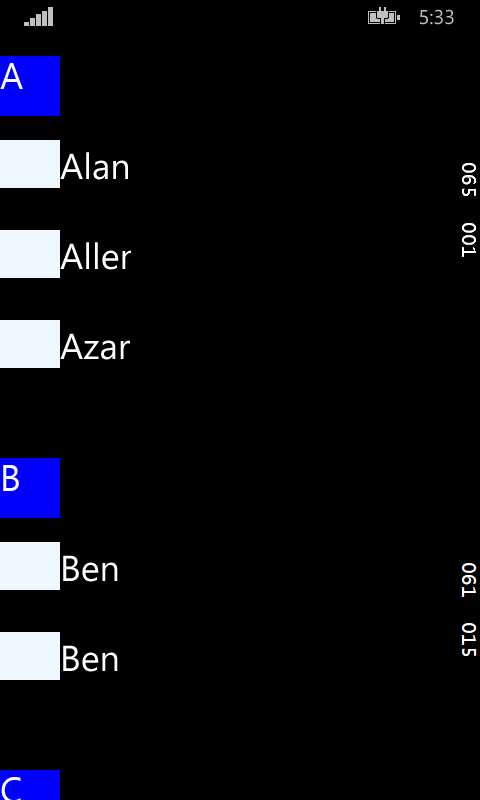
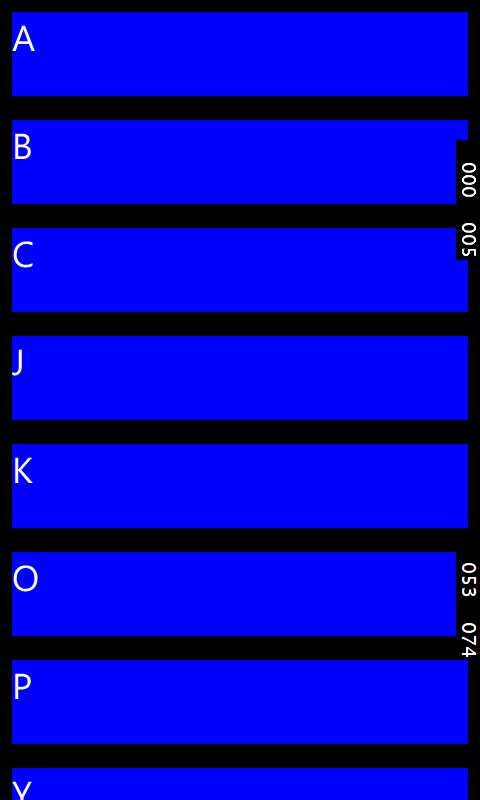
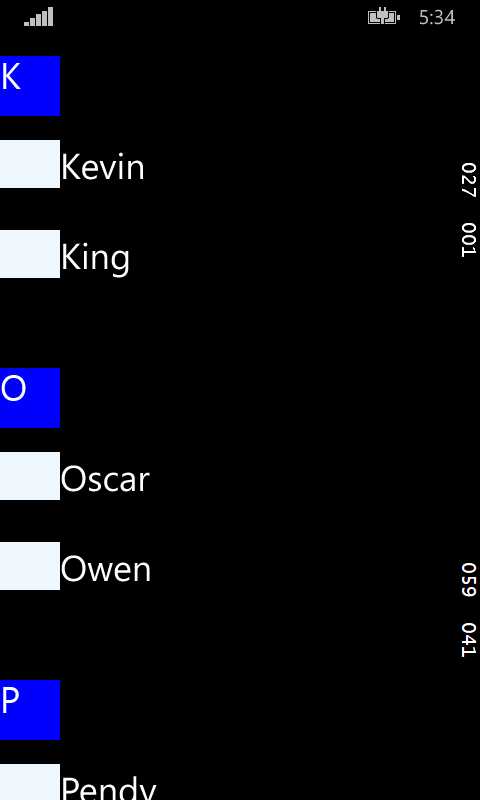
上图1 中,我们点击某个分组名后,出现图2 的视图,在图2 中点击“K” 后,回到列表视图,且导航到“K”分组。
到了,到这里我们对列表选择控件的介绍就完成了,接下来会继续介绍Windows Phone 8.1中的其他新控件,谢谢大家。
Windows Phone 8.1 新特性 - 控件之列表选择控件,布布扣,bubuko.com
Windows Phone 8.1 新特性 - 控件之列表选择控件
原文:http://www.cnblogs.com/shaomeng/p/3671383.html