1 Fragment简介
1.1 Fragment的设计初衷
Android3.0引入Fragment的初衷是为大屏幕的设备提供更加灵活的动态UI设计,由于大屏设备可以容纳更多的UI组件,且这些UI组件之间存在交互关系。Fragment简化了大屏UI的设计,它不需要开发者guan‘li管理组件包含关系的复杂变化,开发者使用Fragment对UI组件进行分组、模块化管理,可以更方便的动态更新Activity的用户界面。
1.2 Fragment特征
Fragment必须被“嵌入”Activity中使用,因此虽然Fragment也拥有自己的生命周期,但是Fragment的生命周期会受到它所在的Activity的生命周期控制:当Activity暂停时,其中所有的Fragment也暂停;当Activity被销毁时,其中所有的Fragment都会被销毁;只有当该Activity处于活动状态时,程序员可以通过方法独立操作Fragment。Fragment
具有如下特征:
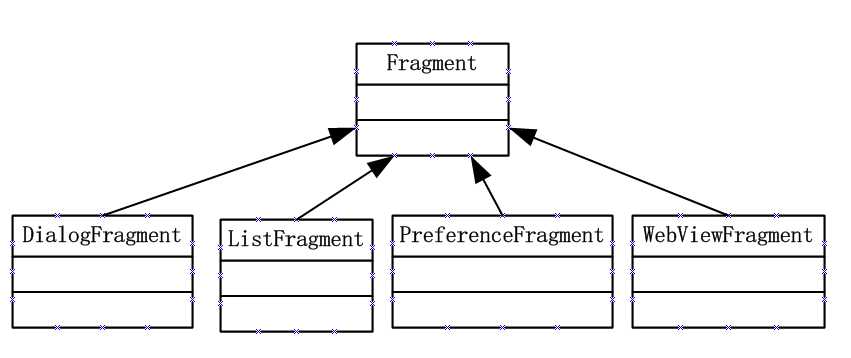
1.3 Fragment的类继承关系
2 创建Fragment
开发Fragment与开发Activity非常相似,区别只是开发两者继承的类分别为Activity及其子类/Fragment及其子类。需要将原来写在Activity中的回调方法也需要在Fragment中实现。创建Fragment通常需要实现如下三个方法:创建时的回调方法onCreate()、绘制界面时的回调方法onCreateView()、用户离开Fragment时的回调方法onPause()
2.1 静态Fragment
使用Fragment最简单的一种方式,把Fragment当成普通的控件,直接写在Activity的布局文件中。步骤:
2.2 动态Fragment
Activity中的Fragment可以动态的添加、删除、更新。
注意:layout布局文件中包含子布局文件,用<include>元素
3 Fragment与Activity之间数据传输
3.1 对象的获取
将Fragment添加到Activity之后,Fragment必须与Activity交互信息,这就需要两者能在各自的空间中获取对方的对象。
3.2 数据的传递
示例:
Activity文件:

import android.app.Activity;
import android.os.Bundle;

public class SelectBookActivity extends Activity implements
        BookListFragment.Callbacks
{
    @Override
    public void onCreate(Bundle savedInstanceState)
    {
        super.onCreate(savedInstanceState);
        // 加载/res/layout目录下的activity_book_twopane.xml布局文件
        setContentView(R.layout.activity_book_twopane);
    }
     //实现Callbacks接口必须实现的方法,实现此方法从Fragment取数据
    @Override
    public void onItemSelected(Integer id) {
        ///Activity向BookDetailFragment发送数据

        Bundle arguments = new Bundle();
        arguments.putInt(BookDetailFragment.ITEM_ID, id);
        BookDetailFragment fragment = new BookDetailFragment();
        // 向Fragment传入参数
        fragment.setArguments(arguments);
        // 使用fragment替换book_detail_container容器当前显示的Fragment
        getFragmentManager().beginTransaction()
                .replace(R.id.book_detail_container, fragment)
                .commit();
    }
}
向Activity发送数据的BookListFragment文件
import android.app.ListFragment;
import android.os.Bundle;
import android.view.View;
import android.widget.ArrayAdapter;
import android.widget.ListView;

public class BookListFragment extends ListFragment {
    private Callbacks mCallbacks;

    // 定义一个回调接口,该Fragment所在Activity需要实现该接口
    // 该Fragment将通过该接口与它所在的Activity交互
    public interface Callbacks {
         void onItemSelected(Integer id);
    }

    @Override
    public void onCreate(Bundle savedInstanceState) {
        super.onCreate(savedInstanceState);
        // 为该ListFragment设置Adapter
        setListAdapter(new ArrayAdapter<>(getActivity(),
                android.R.layout.simple_list_item_activated_1,
                android.R.id.text1, BookContent.itemList));
    }

    // 当该Fragment从它所属的Activity中被删除时回调该方法
    @Override
    public void onDetach() {
        super.onDetach();
        // 将mCallbacks赋为null。
        mCallbacks = null;
    }

    // 当用户点击某列表项时激发该回调方法
    @Override
    public void onListItemClick(ListView listView
            , View view, int position, long id) {
        super.onListItemClick(listView, view, position, id);
        // 获取Activity对象,以调用Callbacks回调方法
        mCallbacks = (Callbacks) getActivity();
        mCallbacks.onItemSelected((int)id);
    }
}
从Activity接收数据的BookDetailFragment文件
import android.app.Fragment;
import android.os.Bundle;
import android.view.LayoutInflater;
import android.view.View;
import android.view.ViewGroup;
import android.widget.TextView;

public class BookDetailFragment extends Fragment {
    public static final String ITEM_ID = "item_id";
    BookContent.Book book;
    @Override
    public View onCreateView(LayoutInflater inflater, ViewGroup container,
                             Bundle savedInstanceState) {
        View rootView = inflater.inflate(R.layout.fragment_book_detail, container, false);
        //Fragment接收Activity传输过来的数据
        Bundle bd = getArguments();
        book = BookContent.itemList.get(bd.getInt(ITEM_ID));
        ((TextView) rootView.findViewById(R.id.book_title)).setText(book.title);
        ((TextView) rootView.findViewById(R.id.book_desc)).setText(book.desc);
        return rootView;
    }
}
Activity布局文件:
<?xml version="1.0" encoding="utf-8"?>
<!-- 定义一个水平排列的LinearLayout,并指定使用中等分隔条 -->
<LinearLayout
    xmlns:android="http://schemas.android.com/apk/res/android"
    android:orientation="horizontal"
    android:layout_width="match_parent"
    android:layout_height="match_parent"
    android:layout_marginLeft="16dp"
    android:layout_marginRight="16dp"
    android:divider="?android:attr/dividerHorizontal"
    android:showDividers="middle">
    <!-- 添加一个Fragment -->
    <fragment
        android:name="com.example.penghuster.fragmenttest.BookListFragment"
        android:id="@+id/book_list"
        android:layout_width="0dp"
        android:layout_height="match_parent"
        android:layout_weight="1" />`
    <!-- 添加一个FrameLayout容器 -->
    <FrameLayout
        android:id="@+id/book_detail_container"
        android:layout_width="0dp"
        android:layout_height="match_parent"
        android:layout_weight="2" />
</LinearLayout>
DetailFragment布局文件:
<?xml version="1.0" encoding="utf-8"?>
<LinearLayout xmlns:android="http://schemas.android.com/apk/res/android"
    android:layout_width="match_parent"
    android:layout_height="match_parent"
    android:orientation="vertical">
    <!-- 定义一个TextView来显示图书标题 -->
    <TextView
        android:id="@+id/book_title"
        style="?android:attr/textAppearanceLarge"
        android:layout_width="match_parent"
        android:layout_height="wrap_content"
        android:hint="哈地方"
        android:padding="16dp" />
    <!-- 定义一个TextView来显示图书描述 -->
    <TextView
        android:id="@+id/book_desc"
        style="?android:attr/textAppearanceMedium"
        android:layout_width="match_parent"
        android:layout_height="match_parent"
        android:padding="16dp" />
</LinearLayout>
4 Fragment管理与Fragment事物
4.1 FragmentManager
4.2FragmentTransaction
如果需要添加,删除,替换Fragment,则需要通过FragmentTransaction对象
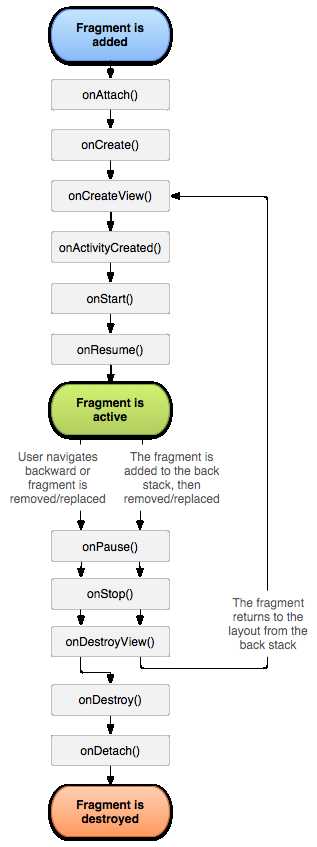
5 Fragment的生命周期
原文:http://www.cnblogs.com/penghuster/p/4905754.html
