学习目标
1.【掌握】UIPickerView简介
2.【理解】UIPickerView显示字符串
3.【理解】UIPickerView显示自定义View
4.【掌握】UIDatePicker简介
5.【掌握】UIPickerView基本使用方法
6.【了解】项目中的常见文件
7.【理解】App启动原理
一、UIPickerView简介
UIPickerView也是一个iOS开发中常用的控件,适用于让 用户选择少量数据,比如设置出生日期、城市、国家等。UIPickerView在iOS6和iOS7后的风格有所改变,之前是拟物化,现在变为扁平化了。 他的用法和我们之前学习的UITableView类似,都需要用到数据源和代理来显示数据和监听事件。
|
1
2
3
4
5
6
7
8
9
10
11
12
13
14
15
16
17
18
19
20
21
22
23
24
25
26
27
28
29
30
31
32
33
34
35
36
37
38
39
40
41
42
|
//1.UIPickerView的常见属性
// 数据源(用来告诉UIPickerView有多少列多少行)
@property(nonatomic,assign)id<UIPickerViewDataSource>dataSource;
// 代理(用来告诉UIPickerView每1列的每1行显示什么内容,监听UIPickerView的选择)
@property(nonatomic,assign)id<UIPickerViewDelegate>delegate;
// 是否要显示选中的指示器
@property(nonatomic)BOOLshowsSelectionIndicator;
// 一共有多少列
@property(nonatomic,readonly)NSIntegernumberOfComponents;
//2.UIPickerView的常见方法
// 重新刷新所有列
-(void)reloadAllComponents;
// 重新刷新第component列
-(void)reloadComponent:(NSInteger)component;
// 主动选中第component列的第row行
-(void)selectRow:(NSInteger)row inComponent:(NSInteger)component animated:(BOOL)animated;
// 获得第component列的当前选中的行号
-(NSInteger)selectedRowInComponent:(NSInteger)component;
//3.数据源方法(UIPickerViewDataSource)
// 一共有多少列
-(NSInteger)numberOfComponentsInPickerView:(UIPickerView*)pickerView;
// 第component列一共有多少行
-(NSInteger)pickerView:(UIPickerView*)pickerView numberOfRowsInComponent:(NSInteger)component;
//4.代理方法(UIPickerViewDelegate)
// 第component列的宽度是多少
-(CGFloat)pickerView:(UIPickerView*)pickerView widthForComponent:(NSInteger)component;
// 第component列的行高是多少
-(CGFloat)pickerView:(UIPickerView*)pickerView rowHeightForComponent:(NSInteger)component;
// 第component列第row行显示什么文字
-(NSString*)pickerView:(UIPickerView*)pickerView titleForRow:(NSInteger)row forComponent:(NSInteger)component;
// 第component列第row行显示怎样的view(内容)
-(UIView*)pickerView:(UIPickerView*)pickerView viewForRow:(NSInteger)row forComponent:(NSInteger)component reusingView:(UIView*)view;
// 选中了pickerView的第component列第row行
-(void)pickerView:(UIPickerView*)pickerView didSelectRow:(NSInteger)row inComponent:(NSInteger)component;
|
UIPickerView的注意点
1.在ios8之前,UIPickerView的高度是(162)固定的,不能被修改。在 ios8后,它的高度就可以修改了。
2.下面这个方法的重用 view 在 ios6之后就一直为空。如果需要适配 ios6之前的系统,为了性能考虑,应该将这个 view 利用起来。
|
1
2
|
//重用View在iOS6之前才有效
-(UIView*)pickerView:(UIPickerView*)pickerView viewForRow:(NSInteger)row forComponent:(NSInteger)component reusingView:(UIView*)view;
|
pickerView的高度设置
如果没有主动设置高度,或者设置为0。则高度默认值216
如果设置的高度大于0且小于180,则高度默认值162
如果设置的高度大于等于180且小于216,怎么高度默认值为180
pickerView 的宽度设置
初始化时没有给定宽度,或者给定的宽度为0,则宽度默认等于屏幕的宽度。
给定了一个不为大于0的宽度,则宽度就等于给定的值。
二、UIPickerView显示字符串
UIPickerView可以显示纯文字,也能显示自定义View。我们用一个简单的案例来演示UIPickerView的基本使用方法,需求是实现滚动选择数据,并将选中的数据赋值给指定的控件,并提供一个随机选择的方法。最终效果图如下所示:
首先我们直接在Main.storyboard中搭建界面,由于只是演示,我就只做了UIPickerView的适配。
我们将选择器中所要展示的数据存储在plist文件中了,并且没有用到字典,所以无需封装模型直接先懒加载数据存储到一个数组中即可。
ViewController.m
|
1
2
3
4
5
6
7
8
9
10
11
12
13
14
15
16
17
18
19
20
21
22
23
24
25
26
27
28
29
30
31
32
33
34
35
36
37
38
39
40
41
42
43
44
45
46
47
48
49
50
51
52
53
54
55
56
57
58
59
60
61
62
63
64
65
66
67
68
69
70
71
72
73
74
75
76
77
78
79
80
81
82
83
84
85
86
87
88
89
90
91
92
93
94
95
96
97
98
99
100
101
102
103
|
#import "ViewController.h"
@interfaceViewController()<UIPickerViewDataSource,UIPickerViewDelegate>
//UIPickerView控件
@property(weak,nonatomic)IBOutletUIPickerView*pickerView;
//用于显示数据的Label
@property(weak,nonatomic)IBOutletUILabel*categoriesLbl;
@property(weak,nonatomic)IBOutletUILabel*timeLbl;
@property(weak,nonatomic)IBOutletUILabel*constellationLbl;
//存储从plist加载进来的数据的数组
@property(strong,nonatomic)NSArray*filterArray;
//随机选择数据的方法
-(IBAction)randomSelect;
@end
@implementationViewController
-(void)viewDidLoad{
[superviewDidLoad];
//设置UIPickerView的数据源、代理
self.pickerView.dataSource=self;
self.pickerView.delegate=self;
//默认选中每列的第一行
for(NSIntegercomponent=0;component<self.filterArray.count;component++){
[self pickerView:nil didSelectRow:0 inComponent:component];
}
}
//懒加载
-(NSArray*)filterArray{
if(!_filterArray){
//从plist文件中加载数据
_filterArray=[NSArray arrayWithContentsOfFile:[[NSBundlemainBundle] pathForResource:@"filter.plist" ofType:nil]];
}
return_filterArray;
}
//随机选择
-(IBAction)randomSelect{
for(NSIntegercomponent=0;component<self.filterArray.count;component++){
//取出第component列的子数组的count
NSIntegercount=[self.filterArray[component] count];
//返回第component列中选中的行
NSIntegercurrentSelectedRow=[self.pickerView selectedRowInComponent:component];
//假设随机生成的行和当前行相等
NSIntegerrandomRow=currentSelectedRow;
//随机生成一个和当前选中行不同的行号
if(randomRow==currentSelectedRow){
randomRow=arc4random_uniform((u_int32_t)count);
}
//主动选中数据
[self.pickerView selectRow:randomRow inComponent:component animated:YES];
//手动调用这个方法,将选中的数据赋值给Label
[self pickerView:self.pickerView didSelectRow:randomRow inComponent:component];
}
}
//返回一共多少列
-(NSInteger)numberOfComponentsInPickerView:(UIPickerView*)pickerView{
returnself.filterArray.count;
}
//返回component列的行数
-(NSInteger)pickerView:(UIPickerView*)pickerView numberOfRowsInComponent:(NSInteger)component{
return[self.filterArray[component] count];
}
//返回component列的row行的title
-(NSString*)pickerView:(UIPickerView*)pickerView titleForRow:(NSInteger)row forComponent:(NSInteger)component{
returnself.filterArray[component][row];
}
//当选中component列的row行时调用
-(void)pickerView:(UIPickerView*)pickerView didSelectRow:(NSInteger)row inComponent:(NSInteger)component{
NSArray*date=self.filterArray[component];
NSString*title=date[row];
//将选中的数据赋值给对应的Label
if(component==0){
self.categoriesLbl.text=title;
}elseif(component==1){
self.timeLbl.text=title;
}elseif(component==2){
self.constellationLbl.text=title;
}
}
@end
|
三、UIPickerView显示自定义View
用一个国旗选择的案例来演示如何让UIPickerView显示的数据是自定义View而不是纯字符串,其实和上面的案例区别不大,只是换了一个返 回每列、每行数据如何显示的代理方法。上面案例是直接返回字符串,这里我们需要返回一个自定义View而已。下图是我们的需求:
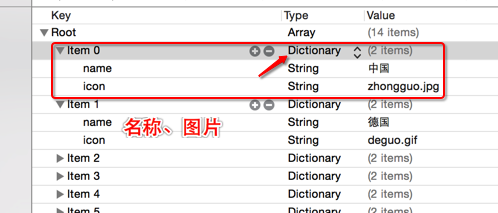
首先创建项目导入plist文件,数据是以字典形式存储的,所以我们需要封装模型。
JFFlag.h
|
1
2
3
4
5
6
7
8
9
10
11
12
13
14
15
16
|
#import <Foundation/Foundation.h>
@interface JFFlag : NSObject
//国旗名称
@property(copy,nonatomic)NSString*name;
//国旗图片
@property(copy,nonatomic)NSString*icon;
//快速创建模型
-(instancetype)initWithDictionary:(NSDictionary*)dict;
+(instancetype)flagWithDictyinary:(NSDictionary*)dict;
//返回模型数组
+(NSArray*)flags;
@end
|
JFFlag.m
|
1
2
3
4
5
6
7
8
9
10
11
12
13
14
15
16
17
18
19
20
21
22
23
24
25
26
27
|
#import "JFFlag.h"
@implementationJFFlag
//快速创建模型
-(instancetype)initWithDictionary:(NSDictionary*)dict{
if(self=[superinit]){
[self setValuesForKeysWithDictionary:dict];
}
returnself;
}
+(instancetype)flagWithDictyinary:(NSDictionary*)dict{
return[[selfalloc] initWithDictionary:dict];
}
//返回模型数组
+(NSArray*)flags{
NSArray*array=[NSArray arrayWithContentsOfFile:[[NSBundlemainBundle] pathForResource:@"flags.plist" ofType:nil]];
NSMutableArray*arrayM=[NSMutableArrayarray];
for(NSDictionary*dictinarray){
JFFlag*flag=[JFFlag flagWithDictyinary:dict];
[arrayM addObject:flag];
}
returnarrayM;
}
@end
|
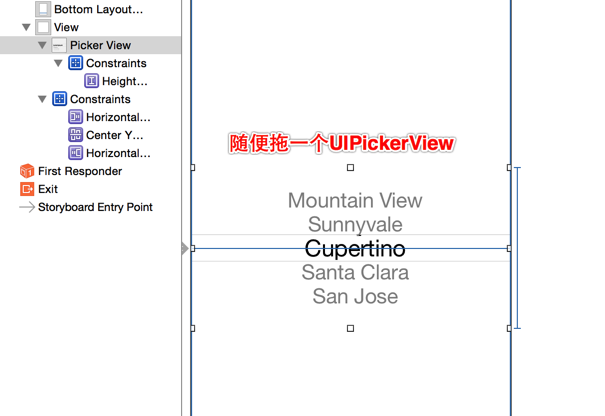
在Main.storyboard中搭建界面,这里我们只需要拖拽一个UIPickerView控件即可。
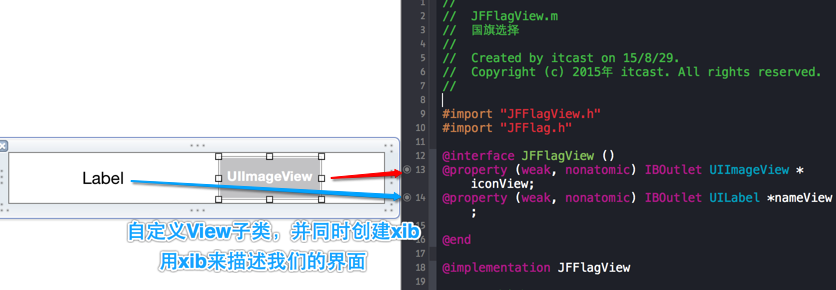
UIPickerView显示的自定义View,也就是类似于我们之前学过的UITableViewCell。这里我们也单独封装自定义View,并用xib来描述这个View,并进行属性连线。
然后实现封装类中的方法,提供一个快速创建自定义View的类方法和为自定义View的子控件赋值的方法。
JFFlagView.h
|
1
2
3
4
5
6
7
8
9
|
#import <UIKit/UIKit.h>
#import "JFFlag.h"
@interface JFFlagView : UIView
@property(strong,nonatomic)JFFlag*flag;
//快速创建自定义View
+(instancetype)flagView;
@end
|
JFFlagView.m
|
1
2
3
4
5
6
7
8
9
10
11
12
13
14
15
16
17
18
19
20
21
22
23
24
25
|
#import "JFFlagView.h"
#import "JFFlag.h"
@interfaceJFFlagView()
@property(weak,nonatomic)IBOutletUIImageView*iconView;
@property(weak,nonatomic)IBOutletUILabel*nameView;
@end
@implementationJFFlagView
//快速创建自定义View
+(instancetype)flagView{
//从xib重创建View
return[[[NSBundlemainBundle] loadNibNamed:@"JFFlagView" owner:nil options:nil] lastObject];
}
//重写set方法为自定义View中的子控件赋值
-(void)setFlag:(JFFlag*)flag{
_flag=flag;
self.iconView.image=[UIImage imageNamed:flag.icon];
self.nameView.text=flag.name;
}
@end
|
最后我们在控制器中懒加载数据,并实现UIPickerView的数据源和代理方法,进行数据的展示。
ViewController.m
|
1
2
3
4
5
6
7
8
9
10
11
12
13
14
15
16
17
18
19
20
21
22
23
24
25
26
27
28
29
30
31
32
33
34
35
36
37
38
39
40
41
42
43
44
45
46
47
48
49
50
51
52
53
54
55
56
|
#import "ViewController.h"
#import "JFFlag.h"
#import "JFFlagView.h"
@interfaceViewController()<UIPickerViewDataSource,UIPickerViewDelegate>
@property(strong,nonatomic)NSArray*flags;
@property(weak,nonatomic)IBOutletUIPickerView*pickerView;
@end
@implementationViewController
-(void)viewDidLoad{
[superviewDidLoad];
//指定数据源和代理对象
self.pickerView.dataSource=self;
self.pickerView.delegate=self;
}
//懒加载
-(NSArray*)flags{
if(_flags==nil){
_flags=[JFFlagflags];
}
return_flags;
}
//一共有多少列数据,注意和UITableView不同的是,就算是只有一列,这个方法也不能省略
-(NSInteger)numberOfComponentsInPickerView:(UIPickerView*)pickerView{
return1;
}
//每组有多少行
-(NSInteger)pickerView:(UIPickerView*)pickerView numberOfRowsInComponent:(NSInteger)component{
returnself.flags.count;
}
//返回每行的View
-(UIView*)pickerView:(UIPickerView*)pickerView viewForRow:(NSInteger)row forComponent:(NSInteger)component reusingView:(UIView*)view{
JFFlag*flag=self.flags[row];
//创建自定义View并赋值数据
JFFlagView*flagView=[JFFlagViewflagView];
flagView.flag=flag;
returnflagView;
}
//返回第componet列的行高
-(CGFloat)pickerView:(UIPickerView*)pickerView rowHeightForComponent:(NSInteger)component{
return50;
}
@end
|
注意:在iOS6之后,返回的View就不能重用了,因为苹果觉得UIPickerView展示的数据量都非常小,没有必须重用。如果是在iOS6之前,也可以重用View。
四、UIDatePicker
UIDatePicker是一个日期选择器控件,他的用法和UIPickerView类似。UIDatePicker继承自UIControl,所 以可以添加监听事件。但是有些童鞋认为UIDatePicker是UIPickerView的子类,事实不是这样的,只是在UIDatePicker内部 封装了一个UIPickerView,所以不要弄错了啊。并且UIDatePicker控件经常和UIToolBar一起使用,也就是给日期选择器添加一 个工具条。
|
1
2
3
4
5
6
7
8
9
10
11
12
13
14
15
16
17
18
19
20
21
22
|
//1.常见属性
// datePicker的显示模式
@property(nonatomic)UIDatePickerModedatePickerMode;
// 显示的区域语言
@property(nonatomic,retain)NSLocale *locale;
//2.监听UIDatePicker的选择
*因为UIDatePicker继承自UIControl,所以通过addTarget:...监听
//3.代码创建UIDatePicker
// 1.创建日期选择器
UIDatePicker*datePicker=[[UIDatePickeralloc] init];
// 2.设置日期显示区域
datePicker.locale=[NSLocale localeWithLocaleIdentifier:@"zh"];
// 3.设置日期模式
datePicker.datePickerMode=UIDatePickerModeTime;
// 4.0 设置最小时间(从当前时间起的前20年)
datePicker.minimumDate=[NSDate dateWithTimeIntervalSinceNow:-(365*24*3600*20)];
// 4.1 设置最大时间(从当前时间起的后20年)
datePicker.maximumDate=[NSDate dateWithTimeIntervalSinceNow:365*24*3600*20];
// 5.设置时间间隔。(该间隔要能够让60整除)
datePicker.minuteInterval=6;
|
五、UIPickerView基本使用方法
使用UIDatePicker和UIPickerView完成选择生日和省份的功能,自定义键盘其实就是为UITextField的 inputView赋值一个自定义View,工具条则是为UITextField的inputAccessoryView赋值一个自定义的View。
自定义UITextField弹出的键盘:
这里第一个文本框的inputView赋值一个UIDatePicker,inputAccessoryView则是一个UIToolBar。
第二个文本框的inputView赋值一个UIPickerView,inputAccessoryView也是一个UIToolBar。
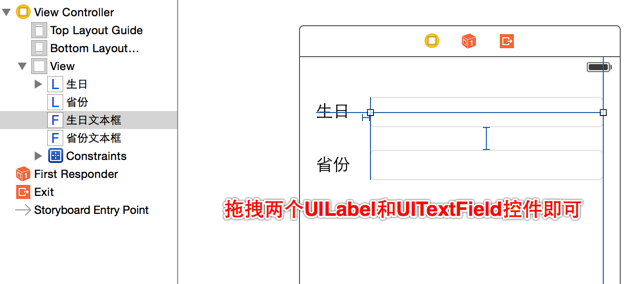
创建项目,在storyboard中搭建界面,这里只需要拖拽两个UILabel和UITextField即可,其他控件需要代码创建 。
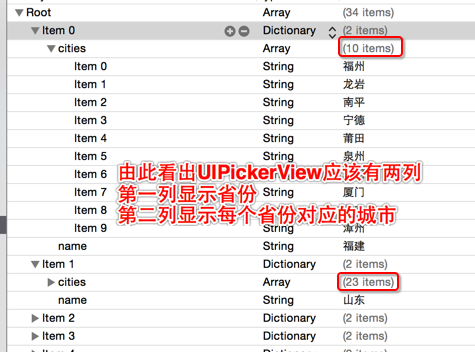
搭建好界面先来创建模型,导入plist文件观察可轻易发现数据的结构。每一个字典中有两个键值对,一个是城市数组,另一个是省份字符串。由此可以 确定,UIPickerView的第一列显示的数据就是所有省份,第二列显示的数据则是每个省份对应的城市,而不是固定的数据。
字典转模型,返回模型数组。已经写了无数遍了,就不再解释了。提供一个返回模型数组的类方法,方便懒加载时直接调用这个类方法返回模型数组。
Province.h
|
1
2
3
4
5
6
7
8
9
10
11
12
13
|
#import <Foundation/Foundation.h>
@interface Province : NSObject
@property(nonatomic,strong)NSArray*cities;
@property(nonatomic,copy)NSString*name;
//快速创建模型对象
+(instancetype)provinceWithDict:(NSDictionary*)dict;
-(instancetype)initWithDict:(NSDictionary*)dict;
//返回模型数组
+(NSArray*)provinces;
@end
|
Province.m
|
1
2
3
4
5
6
7
8
9
10
11
12
13
14
15
16
17
18
19
20
21
22
23
24
25
|
#import "Province.h"
@implementationProvince
//快速创建模型对象
+(instancetype)provinceWithDict:(NSDictionary*)dict{
return[[selfalloc] initWithDict:dict];
}
-(instancetype)initWithDict:(NSDictionary*)dict{
if(self=[superinit]){
[self setValuesForKeysWithDictionary:dict];
}
returnself;
}
//返回模型数组
+(NSArray*)provinces{
NSArray*provinceArray=[NSArray arrayWithContentsOfFile:[[NSBundlemainBundle] pathForResource:@"cities.plist" ofType:nil]];
NSMutableArray*provinces=[NSMutableArrayarray];
for(NSDictionary*dictinprovinceArray){
Province*province=[self provinceWithDict:dict];
[provinces addObject:province];
}
returnprovinces;
}
@end
|
封装好模型后,在控制器中懒加载模型数组。并完成其他一系列调用,具体代码如下:
ViewController.m
|
1
2
3
4
5
6
7
8
9
10
11
12
13
14
15
16
17
18
19
20
21
22
23
24
25
26
27
28
29
30
31
32
33
34
35
36
37
38
39
40
41
42
43
44
45
46
47
48
49
50
51
52
53
54
55
56
57
58
59
60
61
62
63
64
65
66
67
68
69
70
71
72
73
74
75
76
77
78
79
80
81
82
83
84
85
86
87
88
89
90
91
92
93
94
95
96
97
98
99
100
101
102
103
104
105
106
107
108
109
110
111
112
113
114
115
116
117
118
119
120
121
122
123
124
125
126
127
128
129
130
131
132
133
134
135
136
137
138
139
140
141
142
143
144
145
146
147
148
149
150
151
152
153
154
155
156
157
158
159
160
161
162
163
164
165
166
167
168
169
170
171
172
173
174
175
176
177
178
179
180
181
182
183
184
185
186
187
188
189
190
191
192
193
194
195
196
197
198
199
200
201
202
203
204
205
206
207
208
209
210
211
212
213
214
215
216
217
218
219
220
221
222
223
224
225
226
227
|
#import "ViewController.h"
#import "Province.h"
@interfaceViewController()<UIPickerViewDataSource,UIPickerViewDelegate,UITextFieldDelegate>
//文本框控件
@property(weak,nonatomic)IBOutletUITextField*inputField;
@property(weak,nonatomic)IBOutletUITextField*provinceField;
//日期选择器,注意懒加载的控件需要用strong而不是weak
@property(nonatomic,strong)UIDatePicker*datePicker;
//工具导航控件,注意懒加载的控件需要用strong而不是weak
@property(nonatomic,strong)UIToolbar*toolBar;
//模型数组
@property(nonatomic,strong)NSArray*provinces;
//当前选中的省份
@property(nonatomic,strong)Province*selectedProvince;
@end
@implementationViewController
//懒加载模型数组
-(NSArray*)provinces{
if(_provinces==nil){
_provinces=[Provinceprovinces];
}
return_provinces;
}
//懒加载工具条控件
-(UIToolbar*)toolBar{
if(_toolBar==nil){
//创建键盘工具条
UIToolbar*toolbar=[[UIToolbaralloc] init];
toolbar.frame=CGRectMake(0,0,320,44);
toolbar.barTintColor=[UIColororangeColor];
toolbar.tintColor=[UIColorwhiteColor];
//上一个
UIBarButtonItem*lastItem=[[UIBarButtonItemalloc] initWithTitle:@"上一个" style: UIBarButtonItemStyleDone target:self action:@selector(lastClick)];
//下一个
UIBarButtonItem*nextItem=[[UIBarButtonItemalloc] initWithTitle:@"下一个" style: UIBarButtonItemStyleDone target:self action:@selector(nextClick)];
UIBarButtonItem*flexibleSpace=[[UIBarButtonItemalloc] initWithBarButtonSystemItem:UIBarButtonSystemItemFlexibleSpace target:nil action:nil];
//完成
UIBarButtonItem*complete=[[UIBarButtonItemalloc] initWithTitle:@"完成" style: UIBarButtonItemStyleDone target:self action:@selector(complete)];
toolbar.items=@[lastItem,nextItem,flexibleSpace,complete];
_toolBar=toolbar;
}
return_toolBar;
}
//懒加载时间选择器控件
-(UIDatePicker*)datePicker{
if(_datePicker==nil){
//创建日期选择器
UIDatePicker*datePicker=[[UIDatePickeralloc] init];
//设置日期显示区域
datePicker.locale=[NSLocale localeWithLocaleIdentifier:@"zh"];
//设置日期模式
datePicker.datePickerMode=UIDatePickerModeDate;
//设置最小时间
datePicker.minimumDate=[NSDate dateWithTimeIntervalSinceNow:-(365*24*3600*20)];
//设置最大时间
datePicker.maximumDate=[NSDate dateWithTimeIntervalSinceNow:365*24*3600*20];
//设置时间间隔,默认为1,设置的值必须能被60整除
datePicker.minuteInterval=6;
//监听工具条的点击
[datePicker addTarget:self action:@selector(datePickerClick:) forControlEvents:UIControlEventValueChanged];
_datePicker=datePicker;
}
return _datePicker;
}
-(void)viewDidLoad{
[superviewDidLoad];
//设置文本输入框的代理
self.inputField.delegate=self;
self.provinceField.delegate=self;
//默认显示当天日期
[self datePickerClick:nil];
}
#pragma mark - 数据源方法
//城市选择一共有多少列
-(NSInteger)numberOfComponentsInPickerView:(UIPickerView*)pickerView{
return 2;
}
//城市选择第component列有多少行
-(NSInteger)pickerView:(UIPickerView*)pickerView numberOfRowsInComponent:(NSInteger)component{
if(component==0){
//第一列,显示所有省份,所以就是模型数组的长度
returnself.provinces.count;
}else{
//获取当前第一列中选中的数据的索引
NSIntegerprovinceIndex=[pickerView selectedRowInComponent:0];
//根据这个索引获取当前选中的数据的模型对象
Province*province=self.provinces[provinceIndex];
//返回这个模型对象中cities属性的长度,也就是对应城市个数
returnprovince.cities.count;
}
}
#pragma mark - 代理方法
//第component列的第row行显示什么数据
-(NSString*)pickerView:(UIPickerView*)pickerView titleForRow:(NSInteger)row forComponent:(NSInteger)component{
if(component==0){
//显示哪个省
Province*province=self.provinces[row];
returnprovince.name;
}else{
//显示哪个城市
//获取当前第一列中选中的数据的索引
NSIntegerprovinceIndex=[pickerView selectedRowInComponent:0];
//根据这个索引获取当前选中的数据的模型对象
Province*province=self.provinces[provinceIndex];
if(row>=province.cities.count)returnnil;
returnprovince.cities[row];
}
}
//选中第 component 列的第row 行
-(void)pickerView:(UIPickerView*)pickerView didSelectRow:(NSInteger)row inComponent:(NSInteger)component{
if(component==0){
//改变了省份
self.selectedProvince= self.provinces[row];
//刷新第1列的数据(重新刷新数据,重新调用数据源和代理的相应方法获得数据)
[pickerView reloadComponent:1];
//选中第1列的第0行
[pickerView selectRow:0 inComponent:1 animated:YES];
}
NSString*cityName=self.selectedProvince.cities[component==0? 0:row];
self.provinceField.text=[NSString stringWithFormat:@"%@ %@",self.selectedProvince.name,cityName];
}
#pragma mark - 监听按钮的点击事件
//完成按钮
-(void)complete{
//确保用户是选中了省份的
if([self.provinceField isFirstResponder]&&self.selectedProvince&&self.provinceField.text.length==0){
self.provinceField.text=[NSString stringWithFormat:@"%@ %@",self.selectedProvince.name,self.selectedProvince.cities[0]];
}
[self.view endEditing:YES];
}
//上一个按钮
-(void)lastClick{
if(self.provinceField.isFirstResponder){
[self.inputField becomeFirstResponder];
}
}
//下一个按钮
-(void)nextClick{
if(self.inputField.isFirstResponder){
[self.provinceField becomeFirstResponder];
}
}
#pragma mark - 监听日期选择器时间的改变
-(void)datePickerClick:(UIDatePicker*)datePicker{
//获取NSDate对象
NSDate*date=datePicker==nil?[NSDatedate]:[datePicker date];
//创建时间格式化对象
NSDateFormatter*formatter=[[NSDateFormatteralloc] init];
//指定时间格式
formatter.dateFormat=@"yyyy-MM-dd";
//将时间赋值给文本框
self.inputField.text=[formatter stringFromDate:date];
}
#pragma mark - 文本输入框代理
-(BOOL)textFieldShouldBeginEditing:(UITextField*)textField{
if(textField.inputView)returnYES;
if(textField==self.inputField){
//自定义生日文本输入框的键盘
self.inputField.inputView=self.datePicker;
//给键盘添加配置工具条
self.inputField.inputAccessoryView=self.toolBar;
}elseif(textField==self.provinceField){
//默认被选中的省份为数组中的一个省份
self.selectedProvince=self.provinces[0];
//自定义省份文本输入框的键盘
UIPickerView*pickerView=[[UIPickerViewalloc] init];
//指定数据源、代理对象
pickerView.dataSource=self;
pickerView.delegate=self;
//自定义省份输入框的键盘
self.provinceField.inputView=pickerView;
//给键盘添加配置工具条
self.provinceField.inputAccessoryView=self.toolBar;
}
returnYES;
}
@end
|
六、项目中的常见文件
Info.plist是整个项目的重要配置文件不能删除。
Localization native development region :本地化相关。
Bundle display name :程序安装后显示在iphone/ipad上的名字。
Icon file :程序的图标,Xcode5以前创建的项目有,一般用Icon.png,Xcode5以后创建的不在plist设置,在Images.xcassets设置。
Bundle version :程序版本号,AppStore每更新版本,版本要增加,内部项目管理的版本号,不对外。
Bundle versions string, short :用于itunes上显示的版本号,即对外的版本。一般3个数组成。
Bundle identifier :应用的惟一标识,发布到AppStore去。
pch文件干什么用?
pch文件里的内容被项目中的其它所有资源共享访问,定义宏 身高、电话和其它文件共享使用、自定义日志输出。我们在开发阶段,在pch中使用DEBUG模式自定义日志输出宏,当app发布后这些宏就失效。
|
1
2
3
4
5
|
#ifdef DEBUG //开发阶段
#define Log(...) NSLog(__VA_ARGS__)
#else //发布阶段
#define Log(...)
#endif
|
因为pch中的内容会呗项目中其它所有资源共享访问,所以有可能我们项目中不只是有oc文件,还会有其它语言文件。所以我们在定义被共享的内容时,应该加判断。
|
1
2
3
|
#ifdef __OBJC__
//这里的内容是只有.m、.mm文件中才能访问
#endif
|
注意:一般公用的资源写在#ifdef __OBJC__里面。
七、App启动原理
UIApplication
什么是UIApplication?
1.UIApplication是整个应用程序的象征,就像中国的象征是五星红旗。
2.每一个应用都有自己的UIApplication,而且是单例,通过[UIApplication sharedApplication]获取。单例对象也就是程序运行到结束,只能有一个对象。如果我们使用[[UIApplication alloc] init]创建对象,程序不被允许并且会直接报错,因为application只有能一个对象。
3.ios程序启动后创建的第一人对象就是UIApplication对象。
UIApplication用来用来设置全局性的东西
设置网络请求状态/取消网络请求状态
|
1
|
[UIApplicationsharedApplication].networkActivityIndicatorVisible=YES;
|
设置应用图标数字/清除图标数据
|
1
|
[UIApplicationsharedApplication].applicationIconBadgeNumber=2;
|
不过在iOS8更新后不能直接这样设置应用图标的数字了,需要先获得用户的授权,才能显示。完成代码如下:
|
1
2
3
4
5
6
7
8
9
10
11
|
//创建单例对象
UIApplication*app=[UIApplicationsharedApplication];
//判断系统版本是否超过8.0
if([[[UIDevicecurrentDevice] systemVersion] doubleValue]>=8.0){
//如果超过就要获取用户的授权
UIUserNotificationSettings*settings=[UIUserNotificationSettings settingsForTypes:UIUserNotificationTypeBadge categories:nil];
[[UIApplicationsharedApplication] registerUserNotificationSettings:settings];
}
//设置数字
app.applicationIconBadgeNumber=10;
|
设置状态栏样式
方式1.由控制器的一个方法决定
|
1
|
-(UIStatusBarStyle)preferredStatusBarStyle;
|
方式2.使用application设置
|
1
|
[UIApplicationsharedApplication].statusBarStyle=UIStatusBarStyleLightContent;
|
但是这样设置默认是不起作用的,因为默认状态栏样由控制器来管理,如果想用application设置状态栏有效,得在Info.plist的设置View controller-based status bar appearance = NO。
打电话、发短信、发邮件、打开网站
调用application的openURL方法即可,这里就只演示打开网站,其他同理。
|
1
|
[[UIApplicationsharedApplication] openURL:[NSURL URLWithString:@"mailto://1012@qq.com"]];
|
UIWindow
什么是UIWindow?
1.UIWindow是用来显示控制器的View的。
2.每一个应用程序都有一个窗口。
演示UIWindow,在没有设置主要storyboard的情况下
首先在info.plist文件中清空Main storyboard file base name的value。

在AppDelegate.m文件中的didFinishLaunchingWithOptions方法中创建窗口,设置为主窗口并可见。
|
1
2
3
4
5
6
7
8
9
10
11
12
13
14
15
16
17
18
19
20
21
22
23
|
-(BOOL)application:(UIApplication*)application didFinishLaunchingWithOptions:(NSDictionary*)launchOptions{
//创建窗口
UIWindow*window=[[UIWindowalloc] initWithFrame:[UIScreenmainScreen].bounds];
//设置颜色
window.backgroundColor=[UIColorpurpleColor];
//窗口为什么要有根控制器,是因为窗口上要显示视图
UIViewController*vc=[[UIViewControlleralloc] init];
vc.view.backgroundColor=[UIColorgrayColor];
window.rootViewController=vc;
//这一步内部其实是添加控制器的view到窗口上
//[window addSubview:vc.view]
//窗口显示的时候,一定要设置为主窗口并可见
[window makeKeyAndVisible];
self.window=window;
returnYES;
}
|
效果如下:
窗口是一个特殊的UIView对象,可以往window添加子控件,如label、switch等等。但是一般不会在窗口添加子控件,会设置窗口的rootViewController属性,将控制器的view添加到窗口上。
注意:如果直接把控制器的view添加到窗口是不能让控制的view进行旋转的,但设置窗口的根控制器,控制器的view可以旋转。因为旋转事件传递是由UIApplication -> UIWindow -> 根控制器,窗口不会做旋转处理,只有控制器才会。所以别直接将UIView添加到UIWindow上面。
获取主窗口方式
一个窗口当前能接受键盘和非触摸事件时,便被认为是主窗口。还有下面三种方式都能获取主窗口:
|
1
2
3
|
[UIApplicationsharedApplication].delegate.window
[UIApplicationsharedApplication].keyWindow
self.view.window
|
上面的情况是在info.plist中没有指定主要的storyboard,才需要手动创建UIWindow,并创建控制器赋值给UIWindows的rootViewController属性,再设置UIWindow为主窗口并显示。
还有一种情况就是在已经在info.plist中指定了主要的storyboard,这样程序会自动创建窗口,设置窗口的根控制器为storyboard的控制器,让窗口成为主窗口并显示。
App启动原理
我们从第一天开始学习C语言就知道,程序是入口是main函数,OC也不例外!所以程序运行首先执行main函数,main函数就一行代码,不过这一行代码可做了不少事情,main函数如下:
|
1
2
3
4
5
|
intmain(intargc,char*argv[]){
@autoreleasepool{
returnUIApplicationMain(argc,argv,nil,NSStringFromClass([AppDelegateclass]));
}
}
|
1.程序运行后根据main函数中第三个参数创建UIApplication对象,UIApplication是程序中创建的第一个对象。这个参数如果为nil默认就是UIApplication,如果换成我们自己创建的类,就必须继承自UIApplication。
2.根据main函数中第四个参数创建UIApplication的代理对象,并赋值给UIApplication对象的delegate属性,并开启Main Runloop(事件循环)。
3.进行事件的处理,首先会在程序启动完毕后调用delegate对象的 application:didFinishLaunchingWithOptions:方法。此时要分两种情况进行处理了,首先会去 info.plist文件中查找是否设置了主要的storyboard文件名。
如果没有设置storyboard:我们需要手动在AppDelegate.m中的application:didFinishLaunchingWithOptions:中创建UIWindow,然后创建和设置UIWindow的rootViewController。最后设置UIWindow为主窗口并可见。
已经设置storyboard: 根据Info.plist获得最主要storyboard的文件名,加载最主要的storyboard。自动创建UIWindow,自动创建和设置 UIWindow的rootViewController为当前storyboard的控制器(再次提醒:这一步其实是将 rootViewController中控制器的view添加到窗口上显示)。最后设置UIWindow为主窗口并可见。


